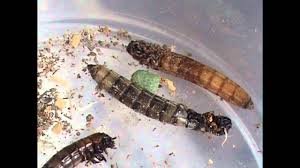
Owning a lizard who eats insects can lean toward the expensive side if you’re buying your feeders from your local petstore. Since variety is the key to a healthy life, different types of insects should be fed to your pet on a regular basis. I own two female bearded dragons and a female leopard gecko. My trio of girls enjoy (apart from fruit and veggies) a mix of crickets, phoenix worms, hornworms, mealworms, superworms, butterworms and waxworms. The first few months that I had my two beardies, I was making a trip to Petsmart 2-3 times a week, and let me tell you, that can get expensive! (See my price comparison chart after this segment) I finally did some research and found some online places which sell bulk quantities of insects to retail customers. If you’re interested in investigating this route for yourself, follow the links to the respective sellers in the chart below. I found that not only was it much easier on my wallet to buy from online wholesalers, but the bugs seemed happier, and there is better selection (I haven’t been able to buy phoenix or silkworms at my local store). I know it sounds strange to talk about happy bugs, but think of it this way: The retailer places their order for 5000 superworms with the wholesaler. We know they’ll order more than just one type, but let’s follow just one bug today. The wholesaler gets the order on Monday. On Tuesday they measure out 5000 worms and pack them into 25 or 50 count containers with a little bit of substrate. They get packed into their boxes, put on the truck and get shipped out on Wednesday. On Thursday afternoon they finally reach their destination. That may not sound too terrible until you consider that they’ll now sit on the shelf at the petstore without food or moisture in that tiny container until you buy them and bring them home. Often when you do, you just open the pack and feed them to your hungry lizard, hopefully dusting a bit of calcium or vitamins on top first. Sure, they’ve retained some nutrients since they’re alive, but I wouldn’t say they’re in optimum shape. Alternately, when you order directly from the wholesaler, you get this box of a wriggling mass of 500 or so worms. Obviously you’re not going to feed them off all at once, so you give them some veggies and let them enjoy a few more weeks of life in the substrate you’ve prepared for them. So you have happier, healthier worms, and by extension, happier, healthier pets. After a few months of high prices and lowered quality, I decided to try my hand at breeding feeder insects myself. It actually came about because my beardies simply lose their minds with excitement when I bring home hornworms, and they’re ridiculously expensive! Even buying these little green delights from wholesalers will break the bank. Unfortunately, breeding them is also pretty labor-intensive, so I decided to check around a little bit and find a feeder which would be a little easier for a newbie. I’d still like to make the attempt with the hornworms, but I think that will be the last species I try. I am now in the process of raising superworms, waxworms, mealworms and waiting for a shipment of silkworm eggs so I can try my hand at those also. My primary reason for breeding these little guys is monetary, however, I am fascinated by their life-cycles and sometimes I just sit there and watch them as they go about their lives in their little micro-worlds. My goal is to write instructive posts according to my personal experiences on each species eventually, but I’m going to start at the beginning: Superworms. Any website you read will tell you that superworms are not worms at all, but actually the larval stage of the darkling beetle. The “worms” can reach about 2-1/2 inches long and are a staple of my beardies diets. They're nutritious, easy to keep (no yucky 'cricket' stink!) and actually can be covered in calcium powder, contrary to popular belief. The girls love them, and I love hearing the “crunch, crunch, crunch” - I know it’s kinda sick, but I do. Whatever my babies enjoy makes me happy. All I have to do is put my hand on the superworm bin and Vexus comes running – she knows what’s in there! 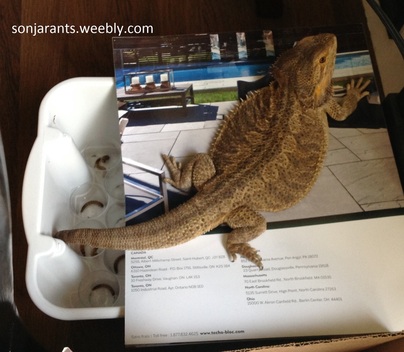 Vexus hanging out on top of the inaugural crop Before I get to my adventures in breeding, here is the price comparison chart with links to Ontario wholesalers I promised. Please keep in mind that things change. Prices go up and down (usually up), websites go away and some things become unavailable, so use this list as a guide only. I cannot estimate shipping, because it usually depends on how much you're buying and where you live. My usual order is about $100.00 and shipping is usually approx. $20.00. All links on this site open in a new window. As you can see, the online places, including personal breeders all have about the same cost per worm. Large scale pet stores charge double and triple. PetSmart - 25pc @ $3.99 = 0.1596ea 50pc @ 5.99 = 0.1198ea (no shipping cost, pickup only) Kijiji - 100pc @ $5.00 = 0.050ea (no shipping cost, local pickup only) Recorp Inc - 500pc @ $18.00 = 0.036ea 1000pc @ $30.00 = 0.030ea (+ shipping) The Worm Lady - 500pc @ $23.95 = 0.0479ea 1000pc @ $40.00 = 0.04ea (+ shipping) Supercricket - 500pc @ $19.99 = 0.04ea 1000pc @ $31.99 = 0.032ea (+ shipping) Capital Dragons - 500pc @ $24.99 = 0.05ea 1000pc @ $39.99 = 0.04ea (+ shipping) Silkworms.ca - 250pc @ $13.00 = 0.052ea 500pc @ $25.99 = 0.052ea (+ shipping) Raising Superworms: My Personal Adventure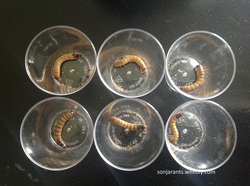 Stage One: Materials Needed 25-50 superworms - if you’re just a newbie it’s usually best to start off small and see where it goes from here. Pick the largest, liveliest guys you have. Happy larva = happy beetles! 25-50 small containers - use whatever is available to you. If you have access to old 35mm film containers, use them. Otherwise, plastic shot glasses are good (that's what I use) and you also have the option of using tackle or bead boxes, as long as you drill holes in the top for air. As long as the sides are high enough, you don’t even need a cover. This is really all you need for the initial stage. As I said, pick the best, largest worms from your repertoire and place one in each container. It is very important that they are alone with no substrate or moisture. Taking away their nourishment will force them to pupate, which is the first step to becoming a beetle. Separation is mandatory because when they get hungry enough they’ll eat each other. That said, once you’ve done this, the waiting begins. I’d love to tell you that everything which follows happens en masse, but that would be a lie. Here and there, your little friends will begin to curl themselves into a ‘c’ or ‘e’ shape. This is good. Straight and black is bad. Curly = getting ready to change. Straight = dead. The changes will begin about a week or two depending on how warm it is in your house. I started in the winter months, so it was usually only about 21.5 degrees Celsius, and it took about two weeks for mine to start curling. In my experience, they will pupate all at different times. It could be one today, three tomorrow, then none, then only one again. There seems to be no rule, except maybe some had bigger reserves than others. They will usually shed their skin at least once during their stint in solitary confinement and I don’t know if it makes a difference, but I usually just remove this and toss it out. Of note: I have used both supers purchased from retailers and from wholesalers. The petstore ones seem to take much longer to pupate and have a higher death rate. I do not know why, as I would assume it would be the other way around, since they’re probably hungry when I get them from the store, but there you have it.  Stage Two: Materials Needed None. During this stage, your little curly buddies will begin to morph into pupae. It’s so great! When they emerge, they’ll be light cream in colour and look like little aliens. As they get ready to become beetles, they’ll darken in colour, beginning with the eyes. As soon as they get a “face”, I know it won’t be long. At this stage, some people will remove them to a separate container to free up a container for a new worm. I like to leave them in there until they become beetles, unless I know I’ll be gone all day and one seems close, then I’ll put it in the corner of the beetle tank and hope he doesn’t get eaten. You will notice that the pupae are pretty much motionless during this period unless you touch them. I have noticed that just before they emerge they’ll start to move their tail up and down slowly. While your larva are pupae, you will have about a week or two (again, depending on temperature mostly) to prepare for the next step. 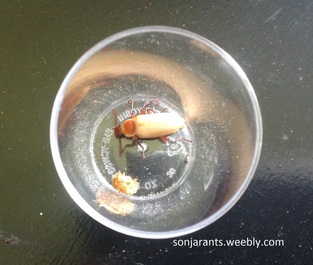  Stage Three: Materials Needed Container - you can use large Tupperware or Rubbermaid bins, old fish tanks, critter holders, pretty much anything plastic or glass (i.e. with smooth sides that can’t be chewed through) is good. Keep in mind how many beetles you’ll be housing, give them a decent amount of space. Eggcrate and/or toilet paper/paper towel cores - anything the beetles can crawl on and congregate under. Substrate - this is their bedding and they will lay eggs in it. Food - veggie and fruit scraps are fine When your little aliens begin to emerge as beetles, they will once again be a very light cream colour. Over the course of the day, they’ll progressively darken until they’re full black about 24 hours after emergence. It’s really important, in my humble opinion, to have good substrate for your feeders. What they eat will be transferred to your pets. Happy bugs = happy pets. Most commonly I read oat bran or something along those lines as substrate. I am not saying they’re wrong; they’ve been doing this a whole lot longer than I have. However, I prefer to make mine nutrient and calcium dense to help all of my babies be as healthy as possible. My substrate recipe is listed at the end of this section. To set up your new habitat, take your container (I use stackable plastic bins I bought at the dollar store usually, but an old frog tank [pictured] is also in use) and place a layer of substrate about 1/2” thick along the bottom. Place some items inside the container that the beetles can climb over and congregate under. I use eggcrate and sometimes will toss in a half of a paper towel roll core. In order to cut down on molding, you may also want to consider a plastic container lid to place their food on. I change their food almost daily, so this is not a concern for me, but better to be safe than sorry. Mold is never a good thing. Once you place your beetles in their new home, you need to make sure that they have access to moisture, i.e. scraps of veggies and fruit. Be careful with fruit, as it does mold rather quickly. Things like carrots seem to dry out rather than mold. If they don’t get enough moisture, they will eat each other. You do not need to worry about removing dead beetles, these guys take care of their own, and they will eat their dead. Yuk, I know, but at least you don’t have to worry about disposal. Good things to give them are lettuce, potato, apples, carrots, fennel, strawberries and sweet peppers. They’re not too picky. Please do not give them anything your particular lizard is unable to eat. Whether it filters down to the eventual baby that your pet will eat, I do not know, but my question is, do you really want to take that chance? For example, onions and tomato plant leaves are toxic to bearded dragons - so these are things that my beetles will never get in their tank. And that’s pretty much it! You let them do their thing and be beetles. FYI, you don’t necessarily need a lid on your container. Although they have the ability to do so, these beetles rarely fly. I have read that they may do so when they feel threatened, but even then do not make it too far. None of mine have ever made the attempt, even though I grab at them and shake their eggcrate like crazy when I’m switching them to a new container. As promised, here is the list of ingredients which make up my substrate (which I use for my worms and beetles): multigrain Cheerios quick oats quinoa millet flax seed Fluker's cricket feed spirulina Reptile Munchies omnivore mix Gerber rice and banana cereal calcium dried thyme freeze dried bloodworms dried oregano sesame seeds dried rosemary wild birdseed mix I take more of some (cheerios, oats) and less of others (bloodworms, flax) and grind them into a mix of fine and coarse ground substrate. The beetles don't burrow, so theirs is a little chunkier, but I'll add some more finely ground substrate to the super's container. I've done some limited research and tried to find dry things that are not poisonous to my beardies, lower in phosphorous and higher in calcium. Final Notes: You’ll have to move your beetles to a new habitat every 2-3 weeks to prevent them from eating their offspring. Remove only the beetles, leaving their jungle gym and everything else behind, as they may have laid eggs on any surface within their enclosure. The eggs are tiny and you won’t be able to see them, so better to be safe than sorry. Just make up a new container using the guidelines in stage three and you can safely move them by picking them up by their sides. As fascinated as I am by them, I don’t actually want to touch them, so I utilize two methods: pick them up with long tweezers that I use to feed my lizards and the shake & dump. I just pick up their eggcrate and shake it into the new container. Some of them are really good at holding on for dear life, but they eventually fall. The tweezers method is not exactly easy; they can be pretty quick little buggers. Whenever you’re going to discard anything coming out of these containers, be it food, substrate, eggcrate or whatever, ALWAYS put it in a plastic bag and freeze it for about 24 hours first. This is an important step where you kill off any babies or eggs that may be left behind. Please ensure that you are a responsible pet owner and that you never release your feeder insects into the wild where they can become pests. Good luck & have fun! ~s
1 Comment
Amar shiva
7/19/2018 12:05:43 am
Great post !!! thanks for sharing Leave a Reply. |
AuthorHi! I'm Sonja and I'm glad you're here! I'm happy to share some recipes and gardening tips with you while I let you know about great (or not so great) products, services, and media I encounter. Visit my online shop at MysteriousDragonfyre.com
for Crystals, Herbs, Incense, and other Witchy things! Categories
All
Hey look! You're visitor #
Visit my online shop at MysteriousDragonfyre.com
for Crystals, Herbs, Incense, and other Witchy things! |