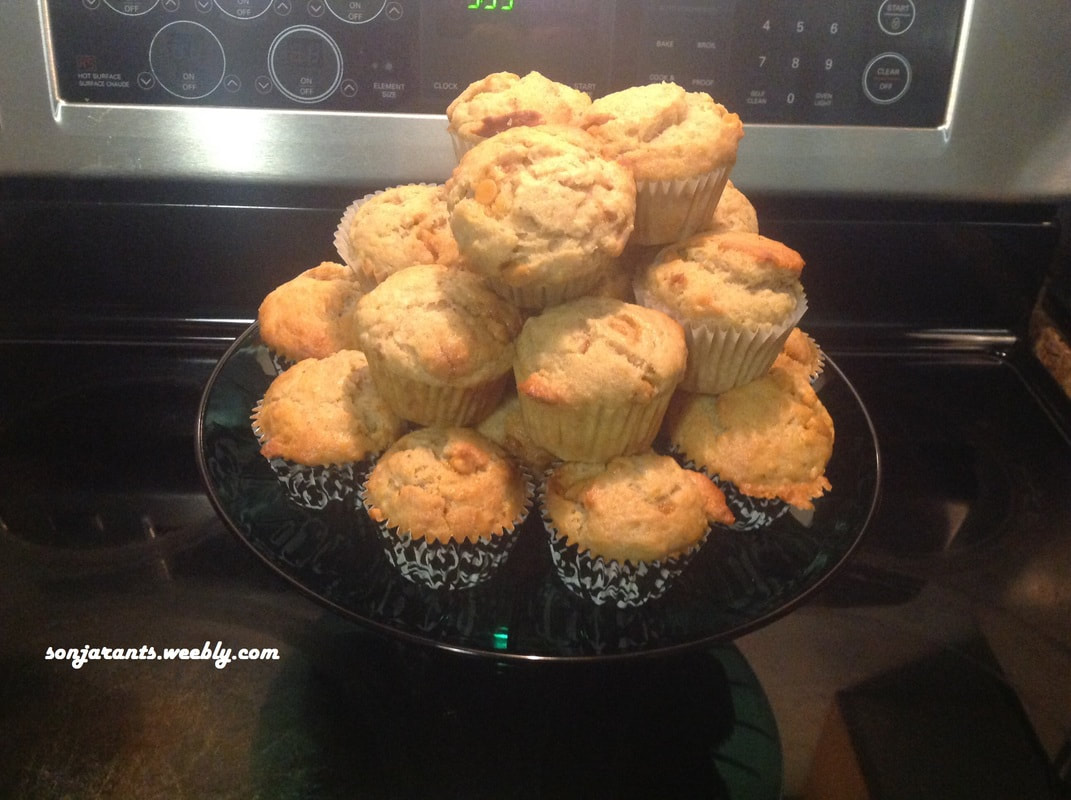
 Another reason I love the fall so much is because this is really the time for baking. The hot days are over and in our house we like to revel in cakes, pies and muffins while we cuddle up in our blankets. I have so many posts waiting in the wings - I've had a whole lot of samples come my way these last few weeks. But I wanted to share all my yummies with you first! I have spent years perfecting my banana bread. Every time I think I've perfected it, I think of something else to add or subtract or change and try again. I use the same batter for the loaf and the muffins, it just depends on what we feel like that particular day. So, although I say this after every new batch, I think that I really have found the perfect recipe this time. The addition of shredded coconut gives it a little texture and the butterscotch chips are better than chocolate. Skor bits don't hurt, either. Let's get to the recipe: Makes 12 muffins INGREDIENTS: 2 eggs 1 tsp vanilla 1/2 cup melted unsalted butter 1/2 cup premium sour cream (premium is thicker) 3 bananas, mashed 3/4 cup sugar 1/4 tsp baking soda 1/4 tsp nutmeg 1/2 tsp cinnamon 1 tsp baking powder 1-1/2 cups flour 1/4 cup shredded unsweetened coconut 1/2 cup butterscotch chips 1/4 cup Skor bits DIRECTIONS:
1. Preheat oven to 425 degrees & line muffin pan(s) 2. Mix together first 5 (wet) ingredients in a large bowl 3. In another bowl, sift together next 6 (dry) ingredients 4. Add the wet to the dry and fold in the chips, coconut and bits, stirring just to combine 5. Spoon dough into muffin tins and bake for 18-20 minutes or until a toothpick inserted into the center of one comes out clean 6. Allow to cool before digging in
0 Comments
 My son keeps seeing the Tim Horton's commercial featuring all of their seasonal pumpkin-inspired treats. Every time it comes on, he tilts his head back, drools slightly and murmurs (disturbingly like Homer Simpson) "mmm... pumpkin donuts...". So what did I do? I baked him some mini pumpkin donuts, of course! I had leftover pumpkin puree from all the pumpkin pies I baked for Thanksgiving. That recipe I will also post for you because, quite frankly, they're the best pumpkin pies you'll ever bake. Every year I get more and more requests for it, it's just that good. But, you'll have to wait a little longer for that one and enjoy these donuts first. Anyhow, I had leftover puree and only one egg and no 'bakery emulsion', so I had to improvise a little, but I think the end result was quite delicious. You can make mini donuts like I did, or regular size, depending on the type of pan you have available. Makes 36 mini donuts INGREDIENTS (for the donut batter) 2 cups flour 1-1/2 tsp baking powder 1/2 tsp salt 1/4 tsp baking soda 1/4 tsp ginger 1/2 tsp cardamom 1-1/4 tsp nutmeg 2-1/2 tsp cinnamon 1/4 cup golden sugar, packed 1/4 cup demerara sugar, packed 1 cup pure pumpkin puree 1 egg 1 small banana, mashed 2 tbsp milk 1/4 cup unsalted butter, melted 1 tsp coconut oil, melted INGREDIENTS (for the frosting) 1 cup powdered sugar 2 tbsp milk 1 tsp cinnamon 1/2 tsp nutmeg DIRECTIONS (for the batter) 1. Preheat oven to 350 degrees & grease donut pan 2. In a smallish bowl, mix together dry ingredients. 3. In a large bowl, mix together the wet ingredients. 4. Add the dry to the wet and stir to incorporate well. 5. Spoon batter into donut pan (with a flat surface, they will rise and become rounded) 6. Bake for about 8-10 minutes. Remove from oven and let cool on a wire rack to prepare for frosting. DIRECTIONS (for the frosting) 1. Thoroughly mix together all ingredients until smooth. Dip each donut into the frosting once it has cooled (they don't take long). Allow frosting to set, if you can keep your family (or yourself) away from them for that long. Enjoy! Recipe adapted (ever so slightly) from deliciouslysprinkled.com. This link will open a new page directly to her recipe - she's got great pictures of the process, including the dough in the pan before baking, just in case I wasn't entirely clear about the whole 'flat surface' thing. 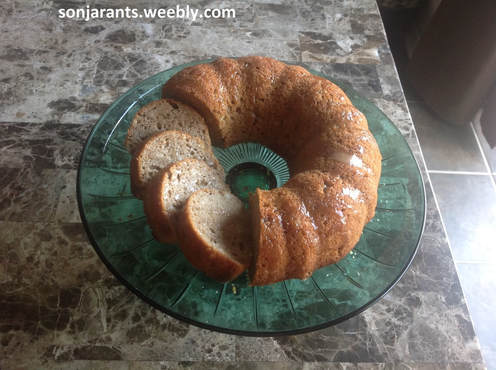 I love fruit. I love cake. I do not love pieces of fruit in my cake. Just not a fan, and I'll usually pass if I see chunks of anything other than chocolate or nuts in my slice of cake. I bought a basket of Ontario nectarines and we did not get through them before they became a little too ripe for just eating. I wanted to bake something with them, but I did not want to do the usual crumble - I wanted cake. What to do? I decided to try something I'd never done before and see if it worked - puree the nectarines and use that in place of the liquid I would normally use. The result was a wonderfully dense, delicious cake. The picture you see here is actually the cake I made the next day - the first one did not last 24 hours. I had only 2 nectarines left, so I added some mixed berries to this one and drizzled some caramel sauce (from a previous post) on top. Makes one bundt cake INGREDIENTS 4 eggs 3/4 cup sugar 1-1/2 cup pureed fruit (you can use peeled peaches, nectarines, berries or any combination) 2 cups all purpose flour 2 tsp baking powder 6 tbsp melted butter 1 tbsp lemon juice pinch salt DIRECTIONS 1. Pre-heat oven to 350 degrees. 2. In a large bowl, beat together sugar and eggs. 3. Stir in the puree. 4. Add flour, salt and baking powder, stir to combine. 5. Finally, stir in the lemon juice and butter. Combine well. 6. Pour into your pre-greased pan and bake for about 45-50 minutes. Check for doneness by inserting a toothpick into the center. If it comes out clean - it's done. Remove from oven and let cool in pan for about a 1/2 hour, then remove and allow to cool further on a rack. You can serve this all by it's lonesome or with caramel sauce drizzled over it, with whipped cream or ice cream. It's not very sweet and pairs well with cold treats. 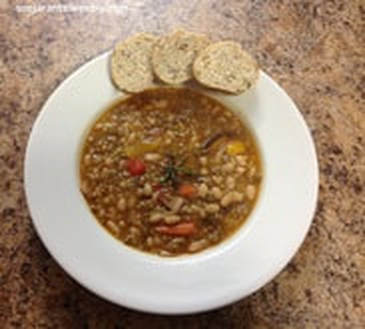 So, yesterday I gave you a long list of things never to eat again, and bacon was high on that list. So today I decided to give you a recipe that has bacon as it's first ingredient! We all know that the average person is not going to cut all the things they love (hello, bacon, I'm looking at you) out of their diet, so let's be realistic. That being said, this afternoon I stared into the fridge (as usual), asking dinner to call out to me. From the crisper drawer, I heard the organic heirloom carrots calling out to me. The sweet peppers my mother-in-law brought me from her garden joined in. I decided to make a soup with them, but what else could I add? Since I had some leftover bacon I figured I had enough time to cook some beans and make a hearty soup. The result was delicious and very filling and it thickened as it sat, so we really didn't even need the bread, but who can resist some day-old multigrain bread dipped in a delicious broth? The point of showing you the good and the bad out there is so that you can make more informed decisions and eat more of what's good and less of what's bad. You can eat anything you like in moderation. Full fats are better for you when they come from natural sources, but you can't overdo it. Serves 6 INGREDIENTS 7 strips of bacon 8 smallish carrots (I used organic heirloom) vidalia onion 2 sweet peppers (I used red & yellow) 7 sprigs of thyme 1/4 tsp freshly ground pepper 3 cups cooked beans (I used navy & great northern) 1/2 cup green lentils 1 tsp smoked paprika 1 tetra pak chicken broth (about 2 cups) 1 cup water 1/2 cup pastina (tiny little pasta - you can also use rice or orzo) DIRECTIONS 1. Chop up the strips of bacon and place in a dutch oven on low while you slice the carrots and coarsely chop the onions and peppers. 2. Add the onions to the bacon and raise the heat to medium-high. Saute for a few minutes, then add the thyme leaves (just rip them off the stem). 3. Once the onions are fragrant, add the paprika and stir. Then toss in the carrots and saute for another couple of minutes. 4. Add the peppers, stir and add a dash of the broth if the bottom is starting to brown a little too quickly. After a minute or so, add in the beans and lentils. 5. Pour in the broth and water and bring to a boil. Lower heat and let simmer for about 1/2 hour - until the lentils are cooked. 6. Add the pastina and cook for about 6-8 minutes longer, until it is cooked through. Serve with day old multigrain or olive bread. *note* If you serve it right away, it will be more of a soup - if you remove from heat and let sit for about 10 minutes, it will be more of a stew - take your pick :) 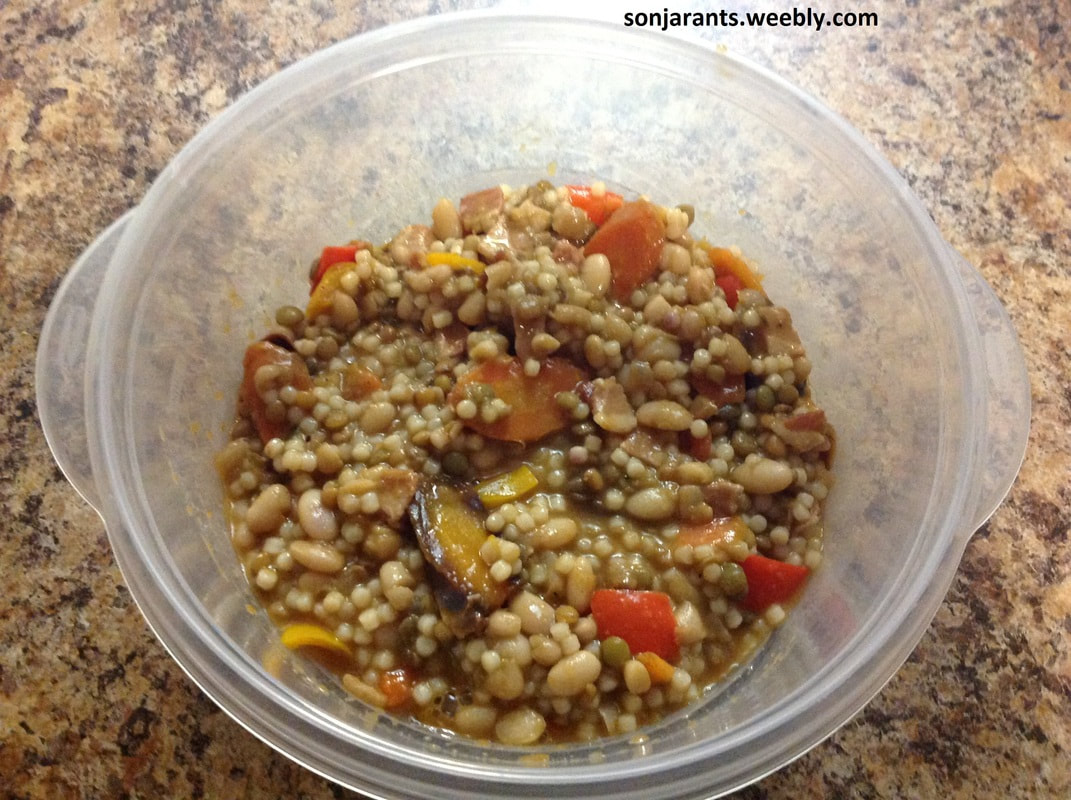 Once we finished with dinner and I went to put away the leftovers, it was definitely thicker.  Fearing an early frost, which is not unheard-of here in balmy Ontario, I went out and harvested my butternut squash. I had four decent-sized ones left in my garden and only one was fully ripe, so although I would have preferred to use two in this soup, I used only the one I had. I didn't want to do the usual diced and roasted as a side dish, so I decided to try my hand at soup while reminiscing about the phenomenal butternut squash soup we ate at my brother's wedding. The end result was a little more watery than you'd expect with this type of soup, but it was quite delicious, especially with the little added crunch you get from the pumpkin seeds. You can probably thicken it up a bit by adding a second squash and letting it boil about 10-15 minutes after you add the cream. For your enjoyment, and to celebrate the arrival of my favorite season, I present you with my version of butternut squash soup. Serves 6 INGREDIENTS 1 squash 2 tbsps maple syrup 1 tsp cinnamon 1 tsp nutmeg 2 tsps salt 1 tsp pepper 1 tart green apple, peeled, cored & chopped 1 vidalia onion, chopped 5 fresh sage leaves, chopped 1-1/2 tbsps unsalted butter 1 tetra pak chicken broth (about 2 cups) 1/2 cup cream toasted pumpkin seeds DIRECTIONS 1) Preheat oven to 325 deg. (*I convection roasted*) 2) Halve squash and place cut side up on a baking sheet. Drizzle with maple syrup, cinnamon, nutmeg and 1 tsp salt and place in oven to roast for about 1-1/2 hours or until soft. 3) Once done, remove from oven and let cool until you can handle it. Spoon out flesh and discard skin. 4) While the squash cools, heat the butter in a dutch oven and add onion, apple and sage and saute until onion is translucent. 5) Add squash and combine, breaking apart chunks. 6) Add remaining salt and broth and bring to a boil. Reduce heat and let simmer for about 10 minutes. 7) Remove from heat and let cool slightly. Using a hand blender, puree until smooth. Add cream and pepper and stir to combine. Top with pumpkin seeds and serve with fresh, crusty bread for dipping. 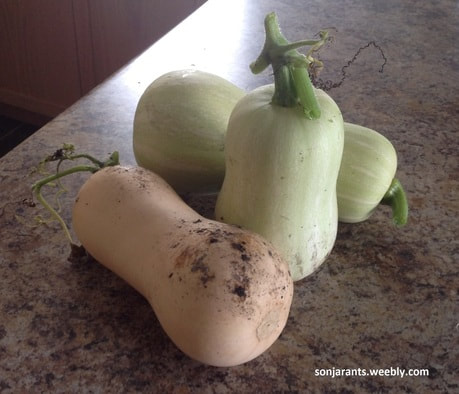  A wonderful thing happened in my garden. I did not plant potatoes, but I found potatoes growing in my little patch of heaven. I think it's safe to assume that because I throw my fruit & veggie scraps back there that these guys just really wanted to live. I started to pull the plants earlier this summer because I thought they were weeds, but when I plucked the first one out, a little tiny potato was attached to the root. So, I quickly re-buried him and on Saturday I went out a-diggin'. I didn't do too badly either, considering I had enough potatoes for a pot of mash with Saturday's dinner (mmm, ribs) and enough left over to make a yummy soup for Sunday's lunch. 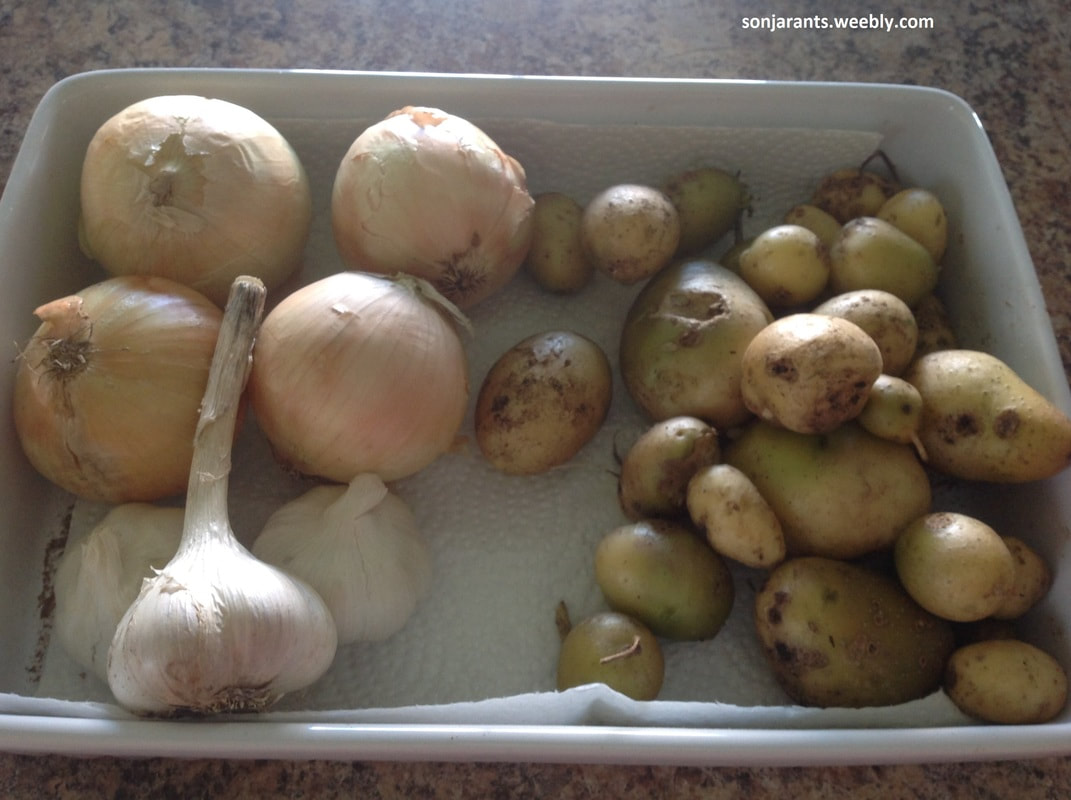 The onions are from the store, but the garlic is from my mother-in-law's garden and these are the left-over potatoes from my garden that became my soup. This soup is so yummy on a fall afternoon and you can have it chunky or creamy, depending on your mood. This recipe gives you creamy, if you want chunky, only blend about half of the soup, then add the other chunky bits back and continue from there. Either way, it's warm and delish and pretty simple to make. Serves 8. INGREDIENTS: 4 strips bacon, chopped 3 leeks, greens removed, chopped 1 vidalia onion, chopped 1/2 head fennel, chopped 6 sprigs thyme, stems removed roughly 3 cups chopped yukon gold potatoes bay leaf 1 tetra pak (4 cups) chicken stock 1 cup water 1 cup heavy cream 1/2 tsp salt 1/2 tsp ground pepper DIRECTIONS: 1) Rinse potatoes in cold water to remove some of the starch and let sit in the water until you're ready for them 2) Crisp bacon in a dutch oven 3) Add leeks, onion, fennel and thyme & saute for about 3 minutes 4) Add chicken stock, water, salt and potatoes, stir and place bay leaf on top 5) Cover and let cook on medium heat for about 1/2 hour 6) Remove from heat and take out the bay leaf 7) Using a hand blender, blend until smooth 8) Add cream and return to heat. Let boil for about 10 minutes until soup thickens slightly 9) Add pepper and more salt if required Serve with day old multigrain bread or grilled cheese sandwiches and enjoy!  I am not a big fan of plain cheesecake, but my family loves it. So I often find myself making interestingly flavored cheesecakes so that I can eat some too. Pumpkin cheesecake is one of my faves to make, and usually I layer it, but this time I decided to incorporate the pumpkin all the way through and top it off with a salted caramel sauce. So good. Since I usually use a chocolate crust when making my pumpkin pie, I thought it would be a good idea to use it here also. I was right. Instead of making a large cake and cutting it up, I used cupcake pans to make individual cakes. I lined the pans with cupcake liners for easy removal, then took them off before plating and drizzling with caramel. For the cream cheese, I used cream cheese premixed with Greek yogurt. I also used farm fresh eggs (laid Friday!), so I can't give you a size, large or extra large will be fine. The caramel sauce is also really yummy on top of vanilla ice cream. Mmm, caramel... 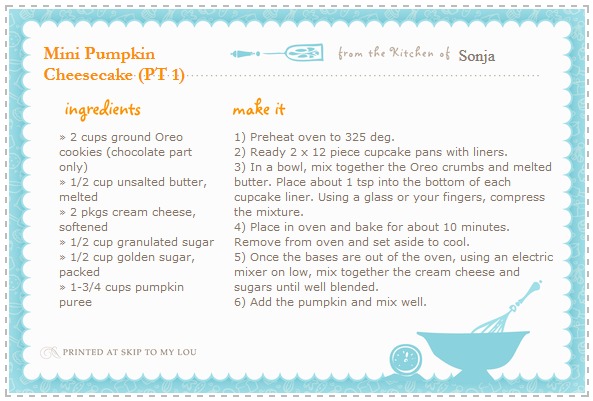 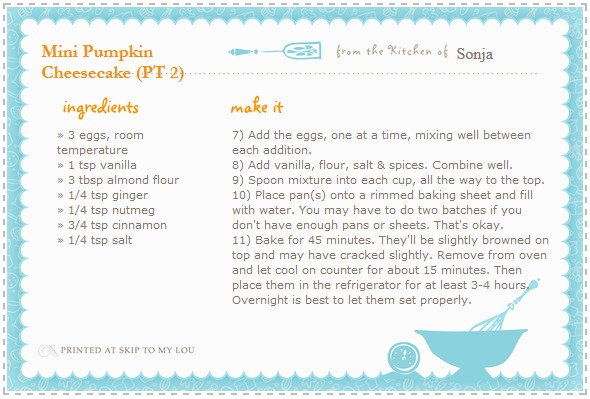 For the caramel sauce, I took inspiration from Nigella Lawson's Salted Caramel Sauce (click here for her recipe). I made subtle changes, but you are welcome to try hers instead. I used maple syrup, but you can sub molasses or agave for the HFCS in Nigella's recipe, which I would not recommend anyone uses, ever. It is a completely unnecessary sweetener which is really, really bad for your health. INGREDIENTS 2/3 cup unsalted butter 1/4 cup golden sugar 1/4 cup icing sugar 3 tbsp maple syrup 1/2 cup 35% whipping cream 3/4 tsp fleur de sel DIRECTIONS 1) Melt butter, syrup and sugars over medium heat, stirring to fully incorporate. Let simmer about 5-7 minutes, stirring every minute or so with a wire whisk. 2) Add cream and 1/2 tsp salt. Stir and taste for saltiness (careful! it's hot). Add more salt as necessary to your palate. 3) Let it cook for another couple of minutes, then remove from heat and let cool in fridge for about a half hour. This sauce is best cooled. You can serve it warm, but it will be very liquidy. After cooling, it gets a nice caramelly consistency. Yup - I just made up two words. Enjoy! 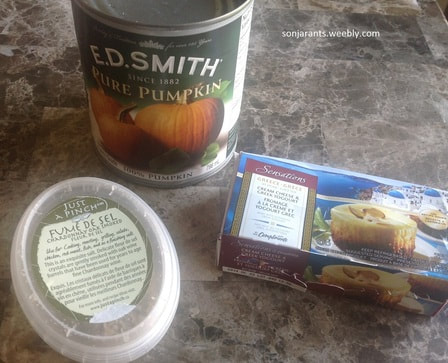  So, a craving for chili may seem like a strange thing to have this week, since the weather has been warm and beautiful, but there you have it. Since I didn't really feel like going to the grocery store, I took a quick look at my available supplies, and off I went! The result was this yummy chili which wouldn't win any awards, but was relatively quick to prepare (unless you factor in the chopping time and the time it took to cook the dried beans) and surely wouldn't be left uneaten. I usually use canned beans when making chili or pretty much anything with beans because it's much, much quicker, but I didn't have anything but dried on hand, so dried it was. I also think that home cooking is not generally an exact science, so all the measurements I've listed below are approximate: I kinda eyeball when I'm cooking. So adjust to taste while you're making this. Another thing to note is that we don't generally eat spicy foods, so if you're looking for spice, add some finely chopped scotch bonnets or cayenne pepper. If you are not a fan of spice, this chili will work for your family. 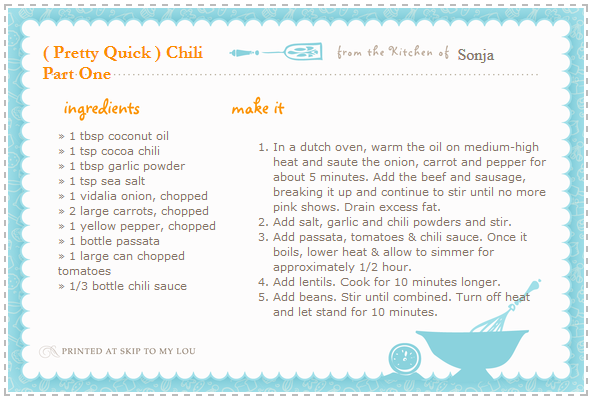 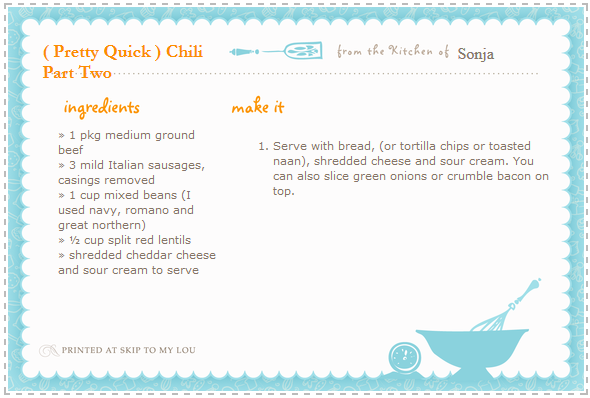 |
AuthorHi! I'm Sonja and I'm glad you're here! I'm happy to share some recipes and gardening tips with you while I let you know about great (or not so great) products, services, and media I encounter. Visit my online shop at MysteriousDragonfyre.com
for Crystals, Herbs, Incense, and other Witchy things! Categories
All
Hey look! You're visitor #
Visit my online shop at MysteriousDragonfyre.com
for Crystals, Herbs, Incense, and other Witchy things! |
