|
As Ostara fast approaches, falling on Thursday March 19th, I wanted to share some recipes, decorations, and ways to celebrate the Spring Equinox as the Wheel turns again. DISCLAIMER: Many items profiled in this article are sold in my new shop at mysteriousdragonfyre.com. I recommend them because I use them regularly in my practice.  Deity & Decoration Ostara is a wonderful time of year to ask blessings of and give offering to the Triple Goddess. In Dragonfyre Wicca, this is the time of year when the Queen of the Witches features prominently in our rites and rituals, and we set our altar with items sacred to Hecate. No matter which Deity you prefer to work with, it is easy to use our setup as a guide. 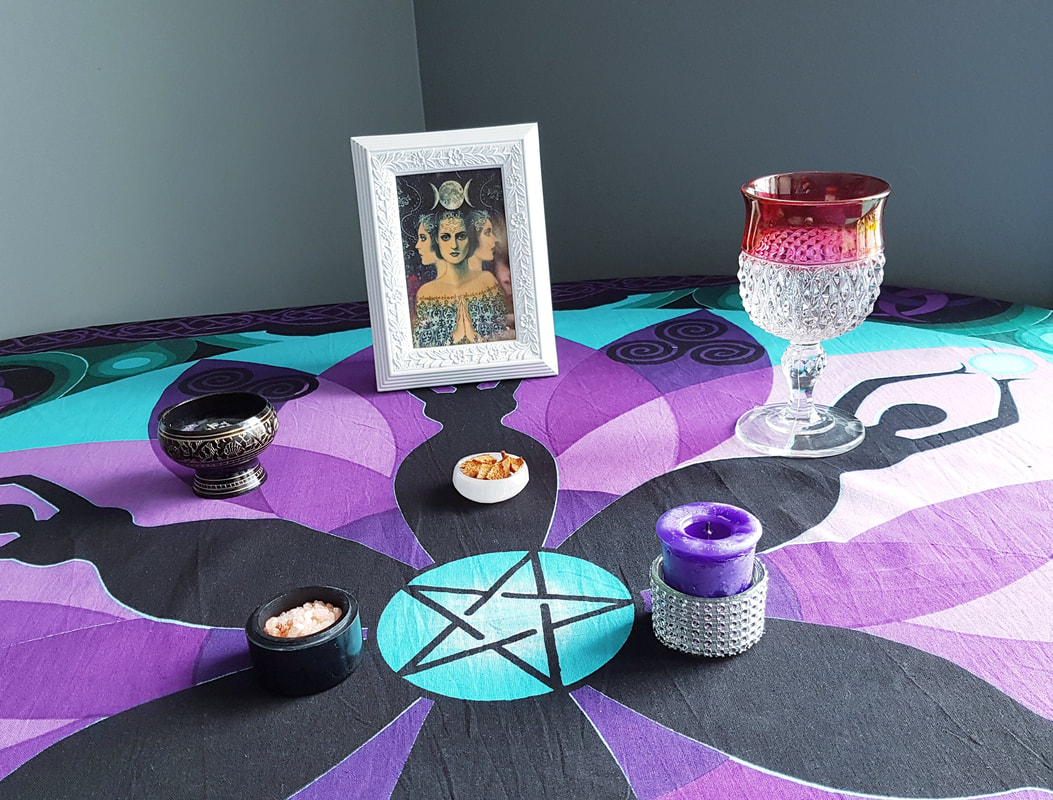 As you can see in the picture above, we have the main items set in the shape of a pentagram, with a framed print of the Triple Goddess representing Spirit, a beautiful chalice that belonged to my grandmother filled with spring water representing the Water Element, a patchouli-scented candle resting in a glittery holder represents Fire, Earth is represented with a soapstone trinket box containing pink salt*, and finally, a black brass incense burner contains purple sand, a charcoal disc, and some dried lavender, ready to burn during prayer. For an offering bowl, we used a tiny selenite bowl and filled it with apple chips that just came out of the oven. This is the basic setup, which features items sacred to Hecate. Since it is Ostara, we like to add a few extra decorations which represent the Sabbat: 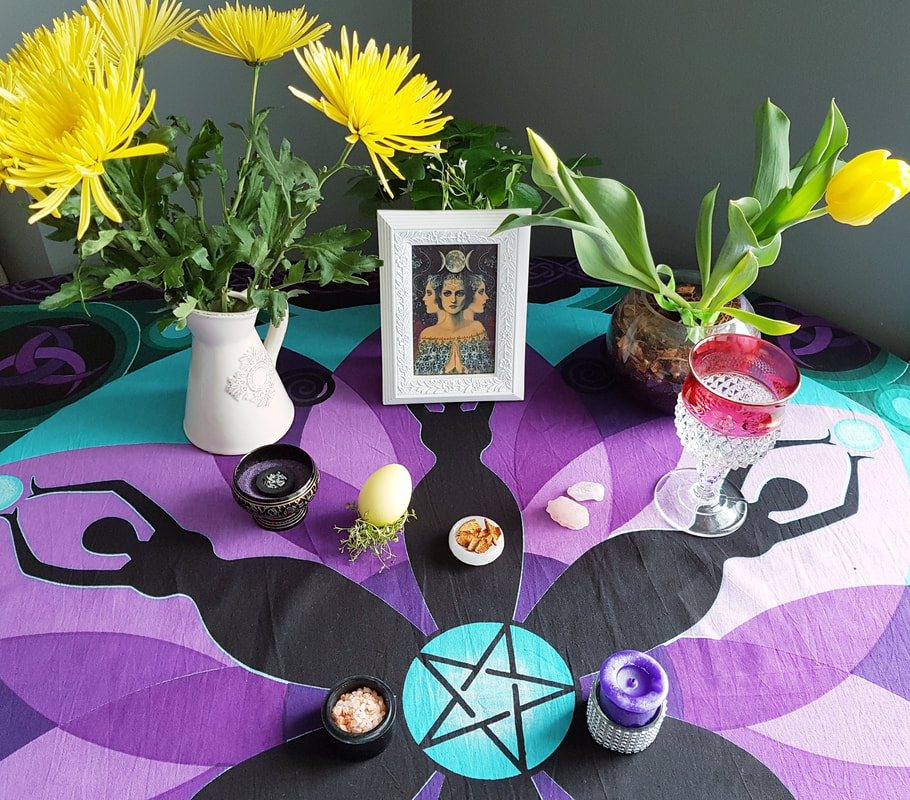 We’ve included a picture of our decorated altar, where we’ve added some yellow flowers and a potted shamrock, an egg (dyed using turmeric, see below) in a 'nest' of fresh thyme, and some rose quartz. Feel free to add any of the above, or mix it up a little with a floral wreath made from springtime wildflowers, which you can wear during ritual, then place around your statue or picture, statues of small springtime animals such as bunnies or lambs, and herbs and stones of the season such as lemon balm, sunflower seeds, rosehips, vervain, clear quartz, agates, lapis lazuli, and amazonite. Traditional & Modern Ways to Celebrate Ostara is all about springtime and the celebration of new life, and so at this time, it is a good idea to perform spells for prosperity, growth, and agriculture. In the days leading up to Ostara, dyeing hard boiled eggs is an ancient tradition that survives to the present day among Wiccans, Christians, and many others. Highlight your wishes for the new season by decorating them with symbols of the season, and then consecrate them in the name of the Goddess of Spring and the God of the Sun.  Runes are perfect to decorate your eggs with. Pictured above: Berkano - beginnings | Fehu - wealth | Sowilo - good fortune | Wunjo - joy. Photo Credit: Peter Lomas via Pixabay Dyeing eggs from natural foods you may already have in your home is incredibly easy. Here are the basics: Bring 4 cups of water and 2 tablespoons of white vinegar to a boil. Add colouring ingredient, lower heat, and simmer for a half hour. When the 30 minutes are up, remove pot from heat and let cool completely and strain to remove foodstuffs. Now, you can add your eggs, and once they reach the shade you like, remove them (with tongs!), dry them with a paper towel, and enjoy! 4 cups chopped beets will make pink eggs, 4 cups of onion skins orange, 3 tablespoons ground turmeric yellow, 3 cups of chopped red cabbage light blue, and 4 cups of blueberries dark blue. I found this recipe and the colour combinations at goodhousekeeping.com, click on the link to be taken to their page with full instructions. You can also create magickal amulets and talismans for fertility, protection, and prosperity. wisewitches&witchcraft.com has a great article with step by step instructions how to make portable magickal items. On Ostara Eve, place some patchouli incense in a hanging censer (or any incense burner you can carry without dropping or burning yourself) and light a lavender candle (also in a receptacle that enables you to safely carry it). Carry both throughout your home, briefly visiting each room, and bid farewell to Winter and welcome the Spring. Once your celebrations are done, take your crushed eggshells and toss them into your garden as an offering to the Fae Folk and as fertilizer for the new plants that will soon begin to poke their heads through the soil. Delicious Things to Eat Traditional foods to enjoy and share with friends and family during Ostara include: biscuits, cheese, eggs, fish, ham, honey cakes, lamb, nuts, seeds, and sprouts. Here are a few of our favorite recipes for you to try out: Deviled Eggs 6 eggs [hard boiled, cooled, and peeled] 1 shallot, finely diced 3 tbsp mayonnaise 1 tsp Dijon mustard 1 tsp apple cider vinegar 1 tsp salt ½ tsp pepper Smoky (sweet) or Hungarian (hot) paprika *Slice eggs lengthwise and remove yolks with a small spoon, being careful not to damage the white. Place whites on a plate and yolks in a small bowl. *Add all remaining ingredients except paprika and mash and stir together with a fork. *Spoon (or pipe) mixture back into holes left by the yolks, and top each with a pinch of paprika. Honey Cakes (I found this wonderful recipe for Medieval Honey Cake online! I bake them in ramekins so they’re smaller, and bake for only about 30 minutes. Source: poppyandprune.com) 3 cups cake flour 1 cup honey ½ cup oil ½ cup milk *Preheat oven to 350°. Line the bottom of a 9” round cake pan with parchment paper and oil the interior. *Mix together flour and honey. When reasonably combined, mix in oil. Then add the milk. When thoroughly mixed, the batter should have a consistency not unlike that of Play-Doh. *Spread the batter into the pan, smoothing with a spatula. Bake 35-40 minutes. This cake is best served warm. Ham & Spinach Quiche (Source: catzinthekitchen.com) 1 store bought pie crust 7 eggs 1 cup chopped fresh spinach 1 cup chopped cooked ham Salt and pepper 1 ½ cups heavy whipping cream 2 cups shredded cheese (a blend of cheddar, mozzarella, and monterey jack) *Preheat oven to 400 degrees. *Place pie crust in pan, flattening it into the sides and trimming any excess. Place in fridge while preparing filling. *Crack eggs into a large bowl, and add heavy cream. Beat until smooth. Add salt and pepper to taste, and then stir in cheeses. Add ham and spinach and stir the entire mixture until well combined. *Pour mixture into pie crust, using a spoon to ensure that it spreads about evenly. Carefully place quiche in oven, and bake for 35 minutes, or until texture is “jiggly” but solid. *Remove from oven and let sit for three to four minutes, then cut and serve immediately. Thank you for spending some of your time with me.
I wish you a blessed Ostara!
0 Comments

As promised, today's post will be all about the much anticipated questionnaires, or surveys, that are listed in the book. I'm not sure how much I'm infringing on copyright laws by giving you the questions, but I'm bringing you along for my ride, and I can't very well only show you my answers without you first knowing what I'm answering. If I do have to remove them, I'll let you know why they're gone, and I'll try my best to describe my answers in a different way.
It's been probably about a week now since I first told you about the book that inspired this series, Lose the Clutter, Lose the Weight by Peter Walsh. I hope you've ordered your copy, either through my special discounted link, through Amazon, or your nearest bookstore, and you've received your special package. If you have, from now on, when I'm speaking about something specific, I'll reference a page number and you can read along (like in school!). If you don't have a copy, don't worry! You do not need one to follow along, since my six week path is VERY different from the one in the book.

Ready? Here we go! On page 35 we get our first survey:
SAVING INVENTORY - REVISED (MODIFIED FORMAT). We're told to answer the questions thinking about how we felt and acted this past week. The scoring chart is pretty straightforward, but they do reverse the wording of some of the questions, so the actual addition at the end is a little tricky. I'll get to that at the end, though. My answer is BEFORE the question (in red) so you don't have to search for it. SCORING: 0=NONE ~ 1=A LITTLE ~ 2=A MODERATE AMOUNT ~ 3=MOST/MUCH ~ 4=ALMOST ALL/COMPLETE 3 - 1) How much of the living area in your home is cluttered with possessions? 3 - 2) How much control do you have over your urges to acquire possessions? 2 - 3) How much of your home does clutter prevent you from using? 1 - 4) How much control do you have over your urges to save possessions? 3 - 5) How much of your home is difficult to walk through because of clutter?
The next set has a slightly different scoring system, but still counts toward your total score.
SCORING: 0=NOT AT ALL ~ 1=MILD ~ 2=MODERATE ~ 3=CONSIDERABLE/SEVERE ~ 4=EXTREME
3 - 6) To what extent do you have difficulty throwing things away?
2 - 7) How distressing do you find the task of throwing things away? 3 - 8) To what extent do you have so many things that your room(s) are cluttered? 0 - 9) How distressed or uncomfortable would you feel if you could not acquire something you wanted? 3 - 10) How much does clutter in your home interfere with your social, work, or everyday functioning? Think about things that you don't do because of clutter. 0 - 11) How strong is your urge to buy or acquire free things for which you have no immediate use? 3 - 12) To what extent does clutter in your home cause you distress? 3 - 13) How strong is your urge to save something you know you may never use? 1 - 14) How upset or distressed do you feel about your acquiring habits? 3 - 15) To what extent do you feel unable to control the clutter in your home? 1 - 16) To what extent has your saving or compulsive buying resulted in financial difficulties for you?
3 - 17) How often do you avoid trying to discard possessions because it is too stressful or time-consuming?
2 - 18) How often do you feel compelled to acquire something you see(e.g., when shopping or offered free things)? 2 - 19) How often do you decide to keep things you do not need and have little space for? 3 - 20) How frequently does clutter in your home prevent you from inviting people to visit? 2 - 21) How often do you actually buy (or acquire for free) things for which you have no immediate use or need? 3 - 22) To what extent does the clutter in your home prevent you from using parts of your home for their intended purpose? For example, cooking, using furniture, washing dishes, cleaning, etc. 3 - 23) How often are you unable to discard a possession you would like to get rid of?
Based upon your answers to these 23 questions, you'll tally up three scores: Your clutter score, your difficulty discarding/saving score, and your acquision score. The sum of those three scores will then give you your overall total score.
Scoring is a bit odd, so pay attention:
Score One: Clutter Add together your answers to the following questions: 1, 3, 5, 8, 10, 12, 15, 20, 22 This is your total clutter score. My total was 26.
Score Two: Difficulty Discarding/Saving
Add together your answers for the following questions: 4 (reversed), 6, 7, 13, 17, 19, and 23 This is your total difficulty discarding/saving score. My total was 19. NOTE: your answer to some questions need to be reversed when adding up your total because of the way they're worded. For example, if you answered question 4 with 0, tally a 4. Use the following as a guide: 0=4 ~ 4=0 ~ 1=3 ~ 3=1 ~ 2=2
Score Three: Acquisition
Add together your answers for the following questions: 2 (reversed), 9, 11, 14, 16, 18, and 21 This is your total acquisition score. My total was 7.
To get your grand total, add all three scores together. My grand total was 52.
On average, people who do not have cluttered homes would generally have a total score in and around 24, while those of us who do have issues with clutter consistently score above 40.
My total score is a little bit embarrassing, to be sure. That score is high. Although my acquisition score is lower than average, my clutter and difficulty discarding scores are way up there. I hate to admit it, but this is pretty accurate. Over the years I have accumulated quite a bit of stuff, through purchases, gifts, and hand-me-downs. I have recently made some changes to my habits so that I'm really thinking about why I'm buying what I want to buy, and that is making a difference, but I have, for years, had issues with letting things go. I know they won't sell for much, and I feel they're worth so much more, so I keep them. Or they have sentimental value, even though they don't necessarily fit in with the decor in my home or have a place to live, and still I hold on to them. As with my shopping habits, this problem I have with letting things go will also have to be addressed while I go through my home de-cluttering all the rooms
Did you take the survey? What did you get as a total? If you're not already in the process of de-cluttering, does that score make you think twice about the stuff in your home? Leave a comment and let me know. As always, thanks for reading, glad you're here.

About a week before I got Lose the Clutter, Lose the Weight, I was already taking steps to streamline my life. I am very much a lover of order, of rules, of schedules. But I am also a person of extremes. This is a part of my personality that gets me in the most trouble, I think. A task that should take me 10 minutes must be done 110%, and in the end, it takes me an entire day, and I’m still not done. So I get frustrated and give up. I’m an all-or-nothing kinda gal (as Hubby will attest), and that will be a major hurdle for me in the coming weeks. Because I’m this way, I can get scattered if I don’t have a clear path to the finish line. And so schedules, plans, and lists are my best friend when I’m trying to get myself back on my course.
A few weeks ago, I went to the local discount store and bought myself three large journals. One would be an actual journal that I would take a few minutes before bed each night to jot down some thoughts, feelings, ideas, whatever remained from the day. Journaling has always seemed like something I should do, since I love to write, and my brain never seems to shut down the running commentary, but I have started and failed to continue this activity too many times to count over the course of my almost half-century on this earth. When the program brings us to my closets, you’ll be introduced to a pile of notebooks that tried to be journals over the years and ended up in a box with very little written in them. I tell myself this time will be different, and I am making a very conscious decision each night to make that a reality.
Why journaling? According to Forbes.com, there are no less than five excellent reasons to do it - and none of them necessarily apply only to creative types:
Clears your mind. Helps you de-stress. A tool for self-improvement. Improves memory and problem-solving skills. Facilitates healing. Follow the Forbes link to a wonderful article written by Noma Nazish (@noma_nz)
The second notebook is a place to record my recipes. I cook and bake a lot. I enjoy it immensely. Baking often leaves me exhausted by the end of it, because everything takes so much time and patience, but I feel real satisfaction when I’ve made something delicious. However, I rarely write things down. I’ll find a good recipe and decide to make it. I usually make little (or sometimes large) changes and jot them down on scraps of paper. Can I ever find them the next time I want to make something? Nope. So I have to try to figure out with my Swiss-cheese of a brain which ingredients I removed, changed, added... and it doesn’t turn out tasting the same. Sometimes it’s better, other times not so much. But maybe dinner and dessert shouldn’t be such a crap-shoot in my house. So I’m going to take the time to write down my recipes so that they’re great every time. When I’m too old to spend any time in the kitchen, my kids may be interested in the recipes, and I’ll have something to show them. My brother and I often lament at holidays that I never asked my grandmother before she passed how to make certain things that we loved. I may figure a few out by trial and error, but most I fear, we will never taste again. As an aside, if you're interested in some of the things I've made and posted here, click on the "Recipes" category in the sidebar.
The last notebook is likely the most important. It is for my daily schedule. A full accounting of most of the hours in the day of a modern human being is difficult to do. Plans can sometimes change on a dime when you have kids and a family, but making the effort will give me a leg up, and I suggest that you buy yourself a notebook and sketch out, at the very least, a rudimentary schedule for the week.
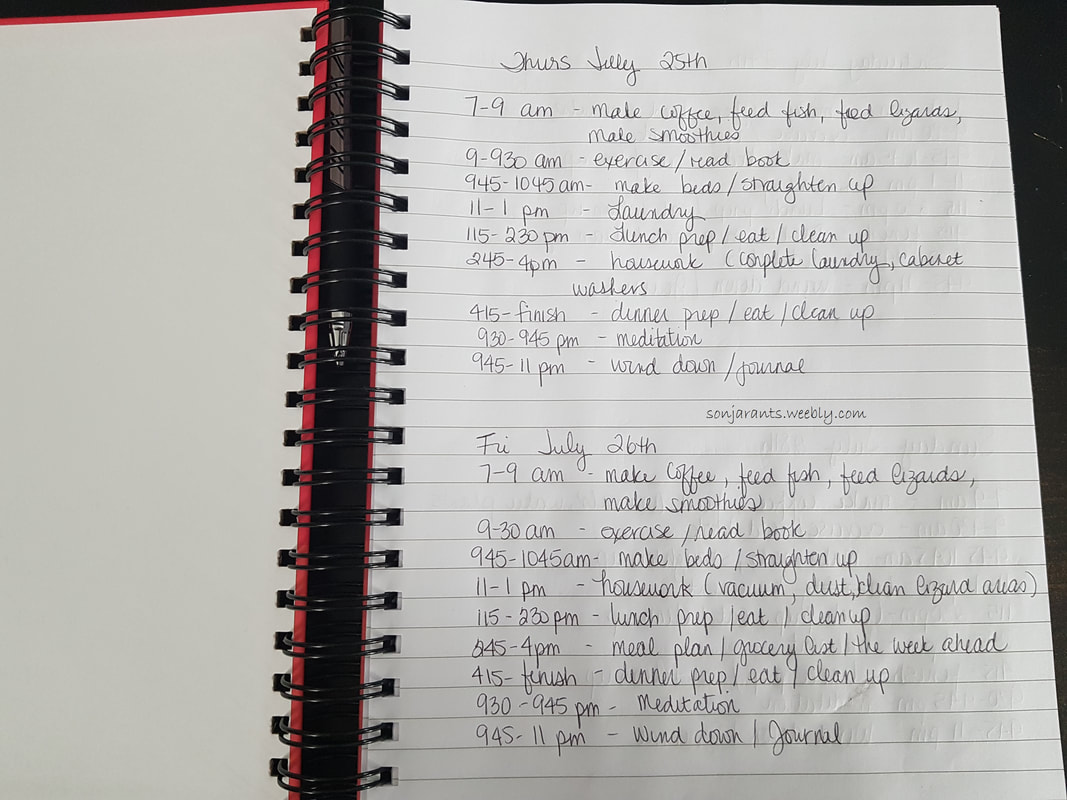
It may seem odd and unnatural at first to schedule almost every moment of your day, but you'll get used to it. What do they say? Do something for thirty days straight and you'll develop a habit. Use that power for good! Not comfortable with this level of anal-retentiveness and/or OCD? That's okay. Don't write down the time, leave out the obvious like "make the bed", you need to find what works for you, because what works for you is what you will stick with. Just find something, even if you purchase a day planner or write it down in an oversized calendar, and stick with it. I promise you this will help you.
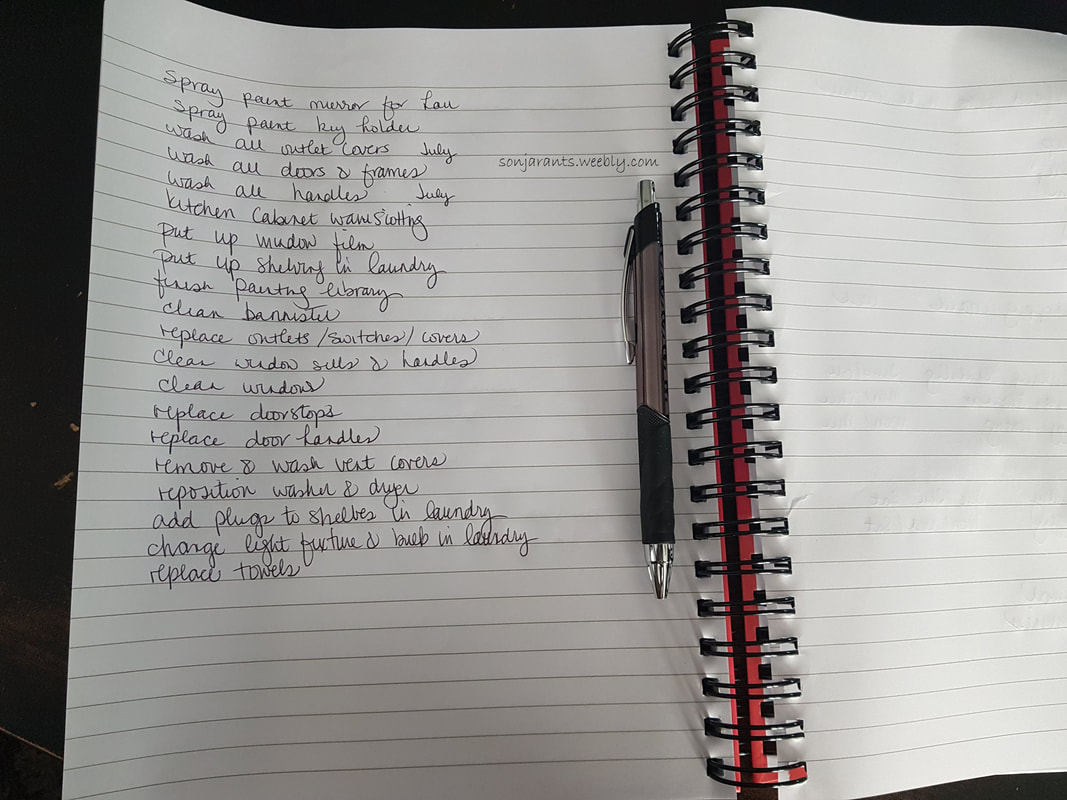
I also made a list of things that wouldn't be done on a weekly basis, maybe bi-weekly, maybe monthly, maybe only once or twice a year. I carry a pen and small notebook with me when I'm working on a room initially, and if I notice something, I make a note of it and add it to this list later. If I complete a task, for example, washing all the door handles, I wrote July next to it. This way I know in a month or so, I should repeat this particular task. Some things like spray painting the mirror, I can check off once complete, since it will be a one-time chore.
The way I went about mine was I started with a list of things that need to be done in my house on a weekly basis; things like laundry, watering the plants, posting items online for sale (during my purge), blogging, planning, my fledgling business, and my husband's business. General housework (once a week stuff like dusting, vacuuming, etc., was a separate category that had it’s own slot, with a subcategory listed.)
Once that list was complete, I wrote a number next to each task indicating how often per week it needed to be done, for example, vacuum 1x, laundry 3x. Next, I staggered as best I could and added days of the week. I wrote out my days with the tasks that happened every day entered and blank spots for the ones that were fluid.
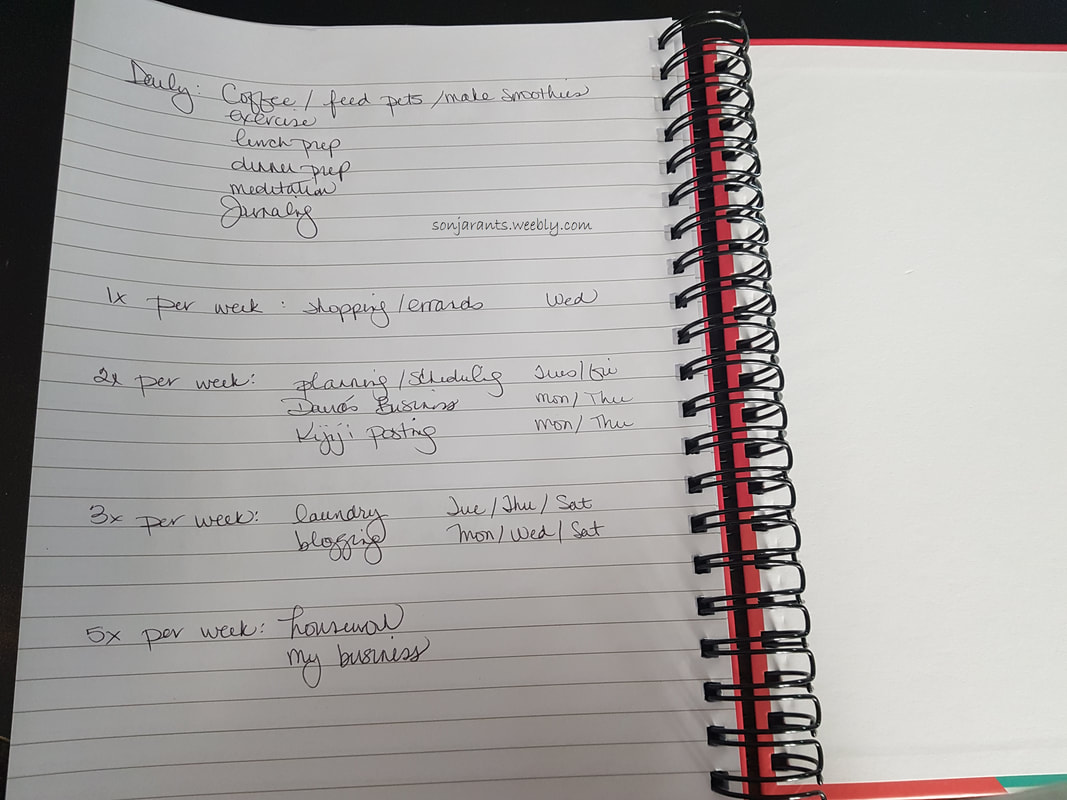
First draft of the "master chore list" as I like to call it. Lots of spacing to add more things. After I took this picture, I remembered that I should add things like taking out the garbage, watering the plants, cleaning the fish tank. It never ends.
Lastly I added in the tasks that changed and set timers on my phone. Now I don’t even have to stress about what time it is and how long I have to complete my current task. I also gave myself permission to go over my allotted time by a few minutes, and if I finished early, I could take a little break before I started the next one.
We’ll get back to the topic of the notebooks a few times over the course of the next few weeks, but I promised we’d get into some questionnaires this post, so we’ll leave the journals for now. Since this post ended up (as usual) much lengthier than I expected, I'll sneak in another post later today with the questions and answers you'll have to think about while completing Peter's program.
Thanks for spending some time with me, I know how valuable it is, especially if you have rooms to de-clutter!

Full disclosure - I am not starting the journey I am about to chronicle from scratch. You're joining up with me about a quarter of the way through. My journey began a few months ago, after I first saw the Minimalism documentary and finally quit working. At that time I did a massive clean up of the "Dump Room", and made quite the dent in the garage, basement, and kitchen. We also made a few upgrades to our home (mainly the kitchen), and so I was forced to do a little cleanup in those areas as well. By no means is my home clutter-free, and in some cases, all I really did was move junk from one room to another.
I'm not going to get too much into my own home today, though. I'd like to keep on track this time and talk about the second, and in some ways more meaningful, motivation for my de-cluttering efforts, and this series of posts.
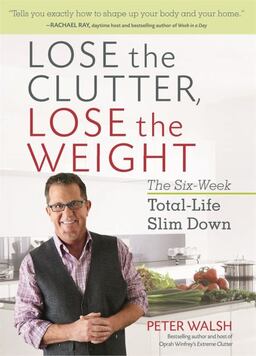
I very recently read a very good book called Lose the Clutter, Lose the Weight by Peter Walsh. I was intrigued by the title, and although I could definitely stand to lose more than a few pounds, I immediately felt the correlation between being overburdened by stuff and being overweight. Before I get too far into it, here are some buying options if you're interested:
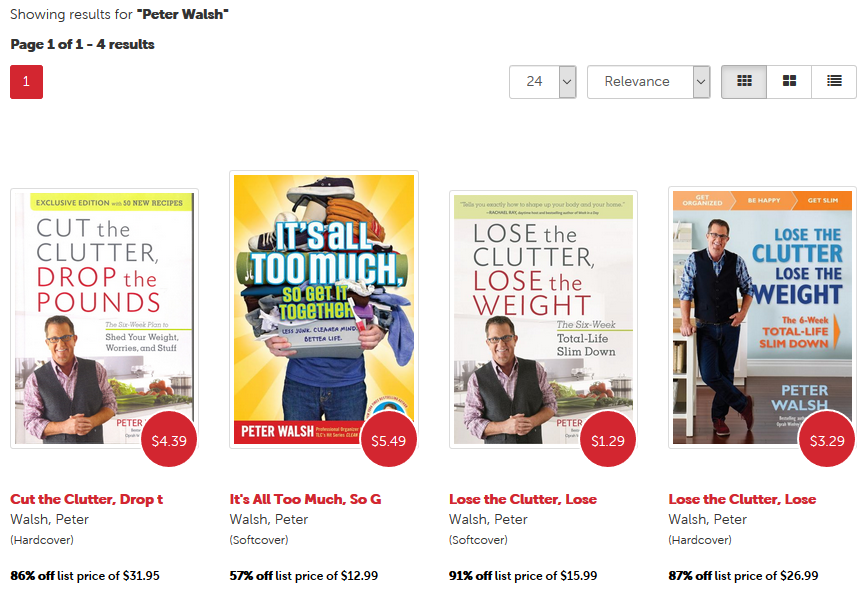
If you're Canadian and love a good deal on books, use my link and get a bargain book copy for only $1.99! The link will also net you $10 off your first order of $25 or more. Once you enter your email, enter 'Peter Walsh' in the search box and you're golden.
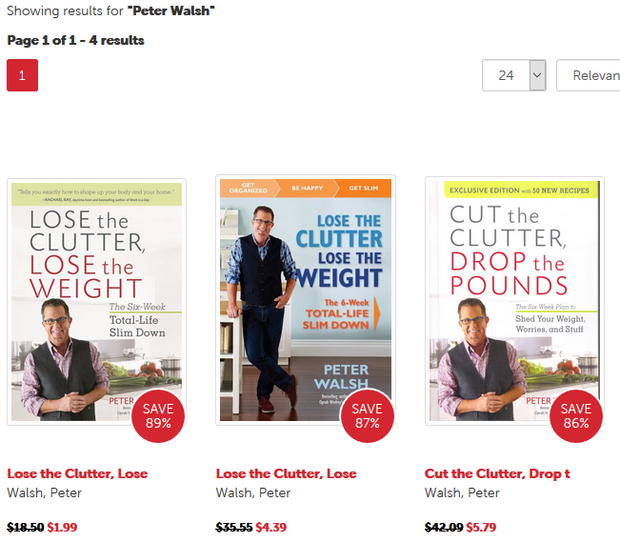
Don't fret, my American friends, I would not leave you out of the bargain book loop. Here's your link to get this book for only $1.29. That link will take you to the Canadian site, but you'll get a pop-up suggesting you shop at their US site. Follow that link and you'll get a discount on your first order. Here's your screenshot:
For those of you who prefer Amazon, here are the direct links to Lose the Clutter:
Canada - amazon.ca - $11.99 US - amazon.com - $9.76 (I do not receive any compensation from Amazon, I offer these links as a courtesy.)
Alright, the commercial break is over. The book seeks to empower you with the tools to take control of your eating habits by giving you simple meal plans that are easy to follow even if you’re a picky eater or have a busy schedule, help you gain some stamina and muscle with the help of simple exercises that can be done almost anywhere with no special equipment or setup, and finally to overcome the mounds of ‘stuff’ that has accumulated around you over the years and is (in many cases) causing mental stress, familial conflict, and is keeping you from living your best life.
It’s a relatively simple premise: eat well (and not too much), move your body, and live in a clutter free environment (both physically and mentally) and you will find that you’re a happier person. Now, I know that his book isn’t called “Lose the Clutter, Find Your Happiness”, but it could be. I think that most people would pick the book up for the opposite reason that I did. Losing the weight would appeal to the masses, which may have been one of the factors in the choice of title. I picked it up because I’m at a place in my life right now where I’m looking for ways to simplify my life, minimize the things in my home, and just be happy. I was already well on my way when I found this book.
Because this post (and this series) is not intended to be a book report, I won’t lay it all out for you here at the outset. As I bring you along with me through the six week program, I’ll share the author’s thoughts and insights, without giving too much away. You will also find precious little in regards to the actual diet plan or exercises for two reasons; I think you should get the book and read it yourself, and also I won’t be following any of his meal plans, and only a few of his recommended exercises. This is not because I don’t think his ideas and suggestions are any good, it’s because our family has our way of eating, and since it rarely includes take out or junky, processed foods since I stopped working, we’re going to stick with our food. I think I already mentioned that I was more into the de-cluttering part of this whole thing, anyway. As for the exercise plan, I have already started my own thing, and may or may not decide to incorporate some of his suggestions in the future. Peter’s advice is, more or less, as long as you’re doing some sort of physical activity that could be classed as exercise and is not a part of your regular routine (i.e. housework is NOT exercise), it’s all good.
Next post, we’ll delve into a few questionnaires you’ll have to fill out to get a better sense of where you stand (yup, I’ll share my answers), and get an overview of Week One. I’ll also share some of the things I’ve been doing to help myself succeed.
Thanks for stopping by, as always, feel free to leave a comment. Have you tried de-cluttering? How far did you get? How long did the process take? How did you feel emotionally while doing it?
It's safe, secure, and only costs you $3. Thank you!
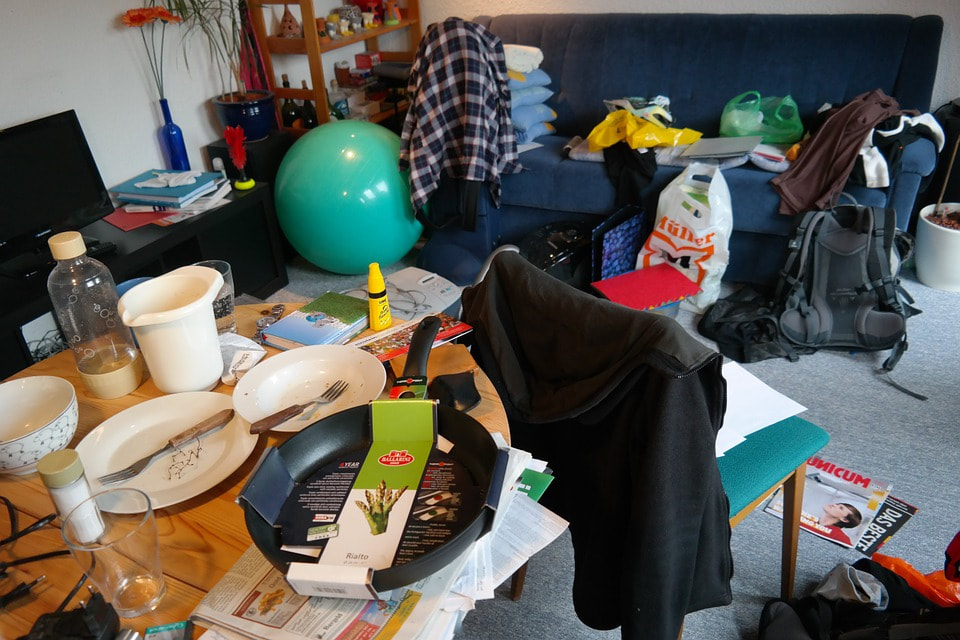
Over the last year I've read some interesting articles and books regarding minimalism. I hate to admit it out loud, but for most of my life I have been surrounded by clutter. I'm just not a very good housekeeper and although I don't really have an impulse buy problem, I do have issues with letting things go. Whether because I think they're bringing some value to my life (even though they've been in a box in the basement for 10 years), or because I think I may find use for them at some point in the future, I always seem to have a ready excuse to hang on to it. Last year was something of a breaking point, though, since an entire bedroom (lovingly labelled "The Dump Room"), my basement, and my garage had become completely unusable because they looked like they belonged on an episode of hoarders. Bags, boxes, papers, and all manner of loose 'stuff' was piled floor to ceiling. And there was always more coming. All I did was open the door, toss it in, and close it again.
The rooms were only part of it. Drawers were filled with junk. Shelves were piled high and covered in dust. Corners became homes to wayward items. My bathtub became an extremely large clothes hamper. Stuff even lived on the stairs.
All of this mess was seriously stressing me out. I was working nights, not sleeping well, exhausted and dealing with a chronic illness. It was a vicious circle and I did not see any way out. I was ashamed. Even though few people knew how we lived (as is often the case), I was always petrified one of the kids would say something and my secret would get out. There was no way in hell that anyone could ever just drop by for a visit. Most times, even when we had lots of advance notice, I would find an excuse to reschedule or cancel because I didn't have the time or the energy to clean up. It was often a sore spot with Hubby, as he is a social creature, and very close to his family. He would ask if someone could come and visit, and it would inevitably start an argument. Even when I relented and we invited people over, it would be a week or two, and I would clean like a mad woman, right up until the time they rang the doorbell. All that work just to get the first floor decent enough. I would still spend most of the visit apologizing because the house was messy and I didn't have time to clean it. With a straight face, no less.
Visitors were banned from going upstairs, which meant the kids couldn't play with their cousins or friends in their bedrooms (where all their toys and video games are), and if the powder room was occupied, well, you had to wait. Which probably seemed odd to some family members, since they are fully aware that I have two full bathrooms upstairs. I'd often tell them that the toilet wasn't working, the seat was broken, or make something else up, just so they wouldn't go upstairs.
Since my house was so full of clutter, I started to let almost everything else slide, too. I tell myself it was the long hours, the exhaustion, the pain, but if I'm being honest (which I will try to be during this series), I think I gave up. I felt despondent looking at all the junk. I didn't know where to start, and so I didn't. I even let the dishes pile up, storing dirty dishes in the oven to make a little counter space the few times a week that I attempted to cook dinner. I rarely even cleaned the bathrooms. We had lived in clutter for years, and now we were beginning to live in filth. I used to always excuse my mess by saying I was messy, not dirty, except that now I was.
By now, some of you may be wondering why my husband or kids never did anything about the mess, or if they got after me about it. The short answer is no, no one helps me clean the house, and no one complains about it, either. The long answer is that my situation is of my own making, and so I am the only one who can change it. This may sound alien to you, but the way both my husband and I grew up was that the man worked and the wife kept house. Those were the roles, and we started our relationship with the understanding that we would continue those roles in our home. I tried, at first, but my mother only worked a few hours a week, leaving plenty of time for the home. I worked full time until about five years ago, and the first five years that we lived in this home I had a ninety minute commute one way. In my husband's eyes, I wasn't keeping up my end of the bargain, and we did fight about it, but that's all we did. We didn't make any changes. I also never taught my kids to pick up after themselves. It's hard to teach skills you don't have.
As with all things, eventually, something has to give. My will to live in squalor finally broke. After a few heated exchanges, some tears, and a lot of pleading, Hubby started helping a little around the house when he could, like doing laundry (sort of), and loading the dishwasher. My kids started helping too, emptying the dishwasher and picking their clothes up off the floor. Not a whole lot of progress, but I was willing to take any help I was offered.
I still felt absolutely paralyzed by my junk. I was doing my best to not be dirty, but we were still messy. I still refused to look into the dumping areas, still pretended they didn't exist. When the neighbor rang the doorbell, I always pretended I couldn't hear it, so that I wouldn't have to open my door and expose my shame.

One day I was scrolling through Netflix, looking for something to watch. I am a sucker for documentaries, and when I came across Minimalism: A Documentary About the Important Things, I hit 'play' without a second thought. This movie was about to change my life. I sat forward, enraptured by the cleanliness of everything. Everything seemed to have strong, clean lines. The sun was shining on all the gloriously smooth, gleaming, clutter-free surfaces. The only dust was by the side of the road, and even that seemed to have a certain order to it.
Don't get me wrong - I may be giving you the sense that everything was sterile. Far from it. The homes looked almost organic. Everyone was living a regular life - only without a crap-ton of stuff. The people making the documentary and being interviewed for it all just seemed content, a calm happiness radiated from them, while the skeptics around them all looked hurried, harried, and well, unhappy. That's what I want for myself, my family and my home, that easy kind of happiness.
The second thing I don't want you to misunderstand is this: I have no intention of going full minimalist like the people in this film. I understand why they did it, I applaud them for it, but within my own life, I need to be realistic. I think a lot of people fail at a lot of their big dreams because they aren't being realistic. I would not be happy in a one room home where there is zero privacy, and I am fully confident that I can say the same about my family. I will definitely do something about the sheer number of t-shirts in my closet, but only 10 or so items of clothing? Maybe not. Will I get rid of my books once I finish reading them? Hard no. I love my books, and there are a great many that have been read over and over. The next time I start Stephen King's The Dark Tower series will be read through #8. I have a kindle full of books (including The Dark Tower!), but when it comes down to it, I need to hold a book in my hand while I read it and will accept no compromise. I also enjoy having some decorative items in my home. They bring me some joy just by looking at them, and I believe that in bringing me this feeling that they have earned their place.
Having said that, I have waaaaaay too much stuff and I am prepared to do something about it. That's where the book, Lose the Clutter, Lose the Weight by Peter Walsh comes in. I had intended this to just be a quick minimalism intro post and spend the bulk of my time with you today talking about Peter's book and it's impact on me, but that obviously didn't go as planned, and so we will leave the book for my next post.
Thanks for stopping by, as always, feel free to leave a comment if you have anything to add or ask.
If you read my "PLEASE NOTE" in the side bar, I wanted to let you know that I'll be systematically going through each post (as time permits) as I have to manually remove the ads. It's a process.
If you haven't read it recently, please do, it has been updated.
It's safe, secure, and only costs you $3. Thank you!
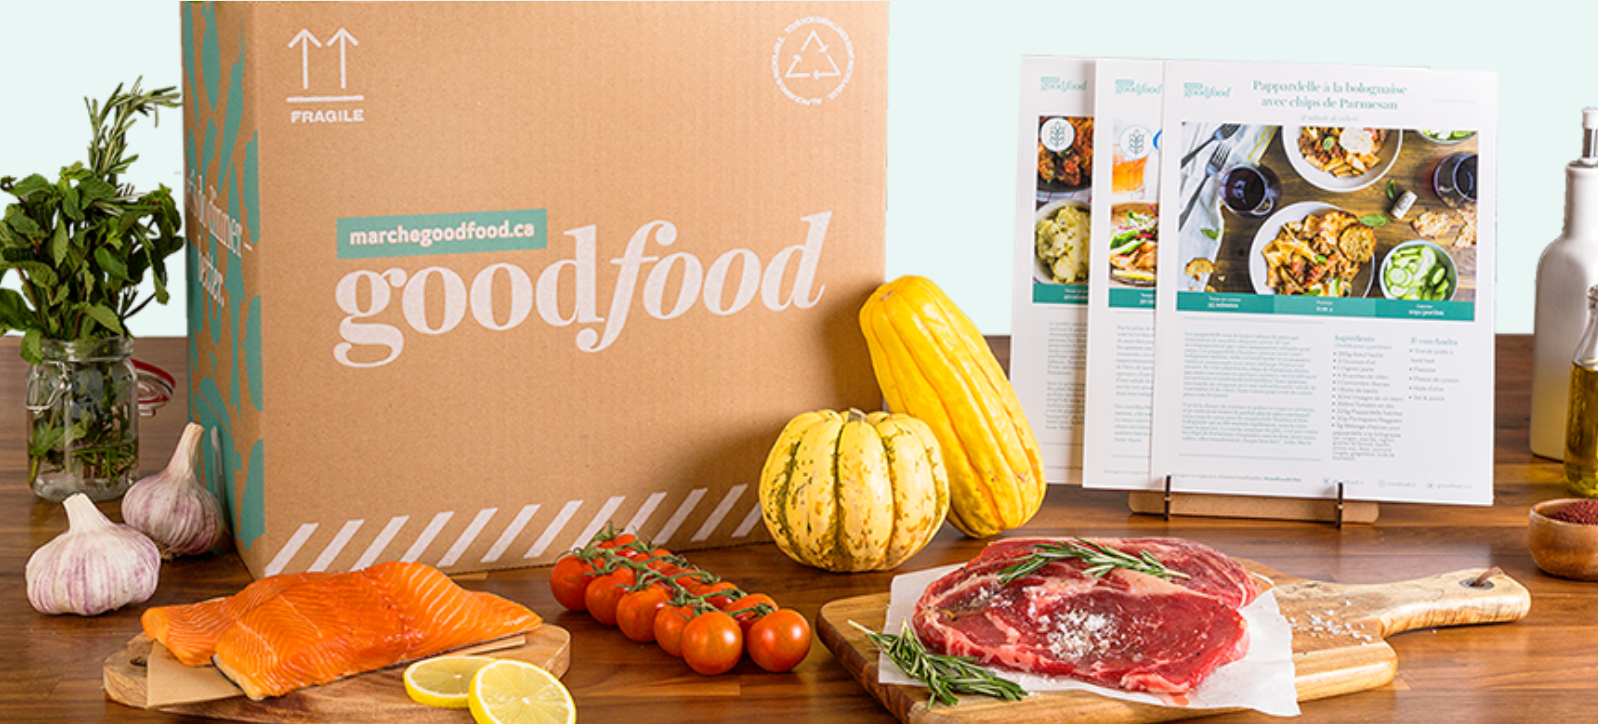 Last week I started a new series where I will order different goods and services from Groupon and let you know how the order process goes and how good the actual items/services are. My first order was a 51% discount on my first order from GoodFood, a recurring subscription for a meal prep kit delivered weekly. (You can read the initial post here.) I signed up for the family box, which consists of four meals that each feed four people and will cost me $140 per week. Each meal will have all the ingredients, washed, measured, and properly portioned, along with a recipe card. The price is surprisingly fair - it's about $35 a meal. Yes, I can absolutely make dinner for less than that, BUT I will have to figure out what I'm making, go to the grocery store to pick everything up, then wash and measure it all prior to cooking. There's also waste to consider. We're pretty good about using up what's in the fridge, but that has only been a recent change in this household. As recent as six months ago I was throwing out a whole lot of spoiling food every week. Even with the recent change in habit where I try to use up everything fresh we buy, I still end up with a decent amount of scraps and odds and ends that I have to throw out because we just can't go through it quick enough. Especially if I need a quarter cup of heavy cream and I have to buy a carton of it. Since things like cream, spices, vinegar, etc., are sent in the exact portion I will need for the recipe, I don't have to throw it out, or have it sit in my cupboard until I'm sure it's no longer any good. Since I am an exceptionally curious person, I wanted to know how the options and pricing available to me through GoodFood compared to other companies offering a comparable service. Mind you, I did some preliminary research before I even signed up because I need to know I'm getting the best bang for my buck, along with the best service on offer. So here are some companies (that deliver to my area), and how they compare:
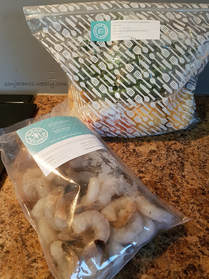
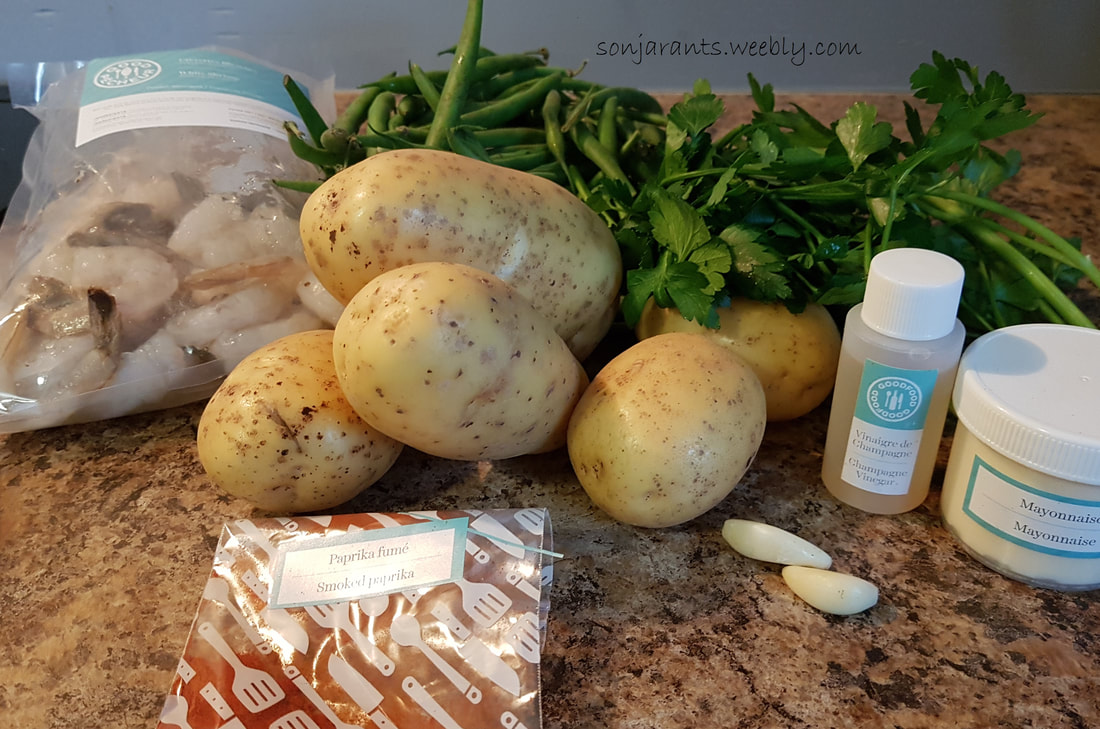
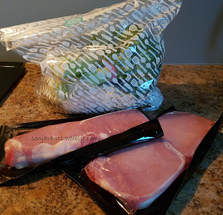
 GoodFood offers two family sized options, The Classic which can be ordered for 2 or 4 servings and offers "unique ingredients... for a culinary adventure" or The Family, which has family friendly fare which can be prepared a little faster. The Classic will run you $150 per week, at a cost of $37.50 per meal and The Family is $140 per week, which is $35 per meal. I would love to try out The Classic, but I have a very picky eater, and little time for cooking most nights during the week, so The Family it is. Also, of note, I found the GoodFood website very easy to navigate, and quickly found all the information I was looking for. The same cannot be said of 3 out of 4 of the 'competition' - Chefsplate wanted my email address right away, Fresh City was not user friendly, and Prepd looked like an eleven year old used a free website builder. Only the HelloFresh website was as easy and informative as GoodFood. My first box arrived on Tuesday February 28th. I received an email the day before letting me know what to expect in my box and that it would arrive at some point before 8:00pm. Since their box is lined and contains ice packs, you do not need to worry about being home when it arrives. Our box arrived at some point between 4:00 and 6:00. I say at some point because although there were two cars in our driveway, no one rang the doorbell or knocked on the door to let us know we had a delivery. I found that a little odd. If I hadn't happened to look out the front door around 6:15, I wouldn't have known it was there. I probably would have only gone out to look around 8:00, wondering where my food was. 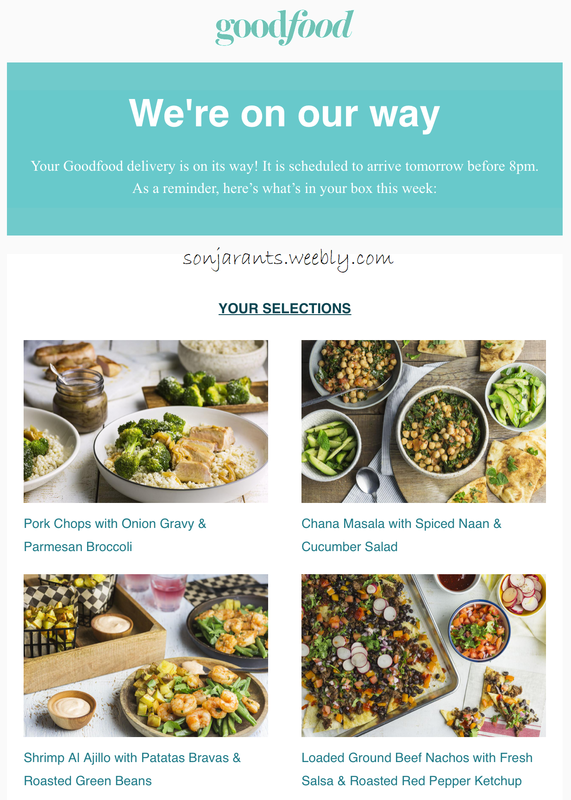 That aside, I was excited to bring in my box and check out the contents: 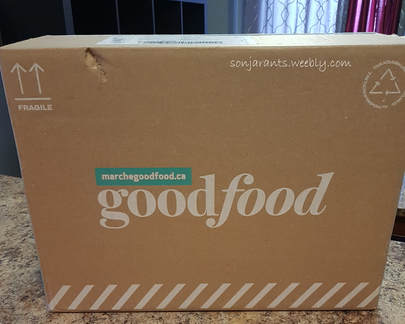 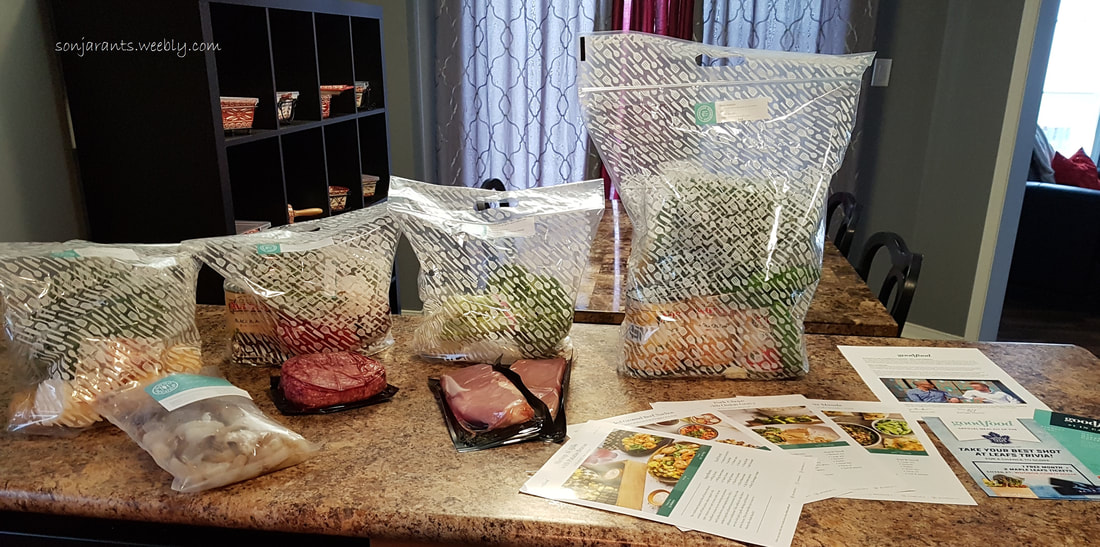 There was a whole lot of goodness packed into that box, it was difficult to get it all into one shot. Just a quick glance assuaged my fears of portion sizes, this looked like a decent amount of food. 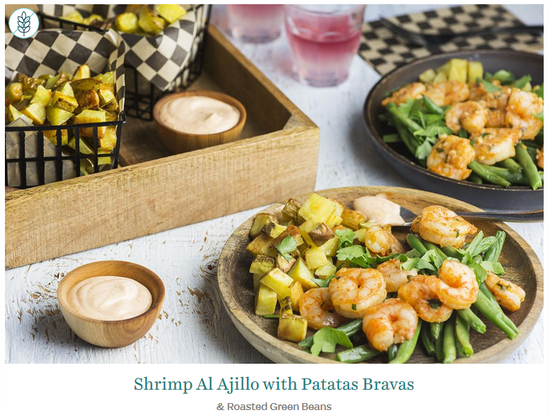
First up, Shrimp Al Ajillo with Patatas Bravas. From my research I have learned that all of the aforementioned meal kit deliveries come with recipe cards. As you can see from the photo above, GoodFood sent me beautiful, full page recipe cards that were exceptionally easy to follow and will definitely find their way into a binder with two sections: "Make Again" and "Nope". GoodFood also has a link to each recipe on their website, so if you spill something on your card, or if the dog chews it up, you're good. Shrimp Al Ajillo will make it into the Make Again section. I hate green beans. Hate them. I haven't touched a green bean in over twenty years. These green beans were so good I actually wanted more! The shrimp were also good, but the real star of this meal were the potatoes. Simply roasted, but with the addition of the smoked paprika mayo - a delicious surprise. The recipe card states 35 minutes for prep time, but it took me just under an hour from start to plate. Maybe I'm just slow at cutting the ends off of the beans or pulling the tails off of the shrimp. 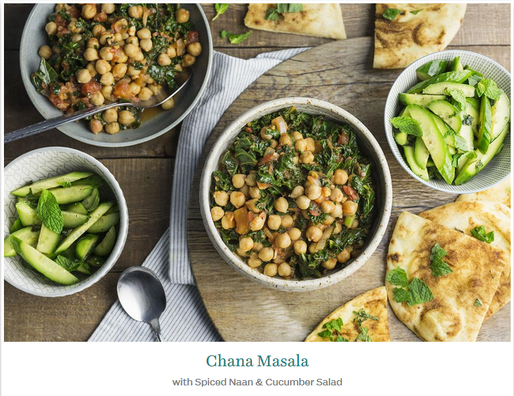
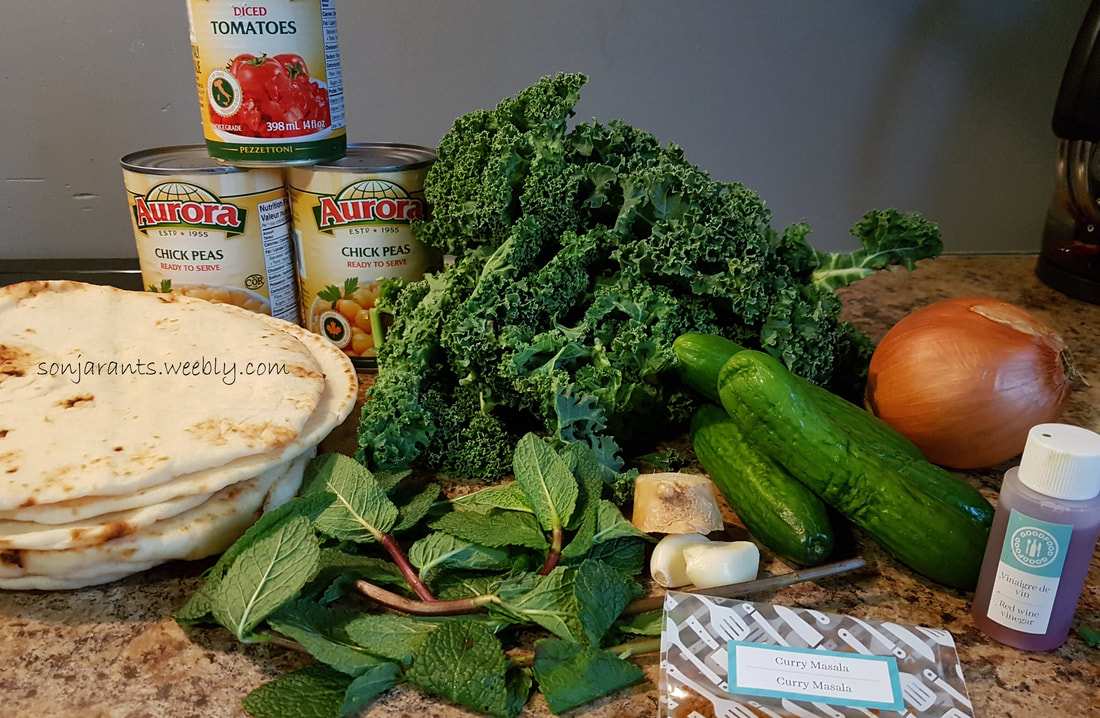
Day two was Chana Masala. Hubby really enjoyed this dish, but the rest of us weren't too keen. Since it's an East Asian dish, I expected really bold flavors, but I found it really bland. I don't care for chickpeas or kale, so I was hoping the spices would make it worthwhile. The spiced naan was quite delicious, even if there was too much vinegar on the salad. My older son only ate about half of his meal (that has probably only happened a handful of times in his 18 years on this planet), and I had to make the younger one a peanut butter sandwich because he took one bite and said nope. The recipe card states 40 minutes for prep time, and that time was pretty much bang on. 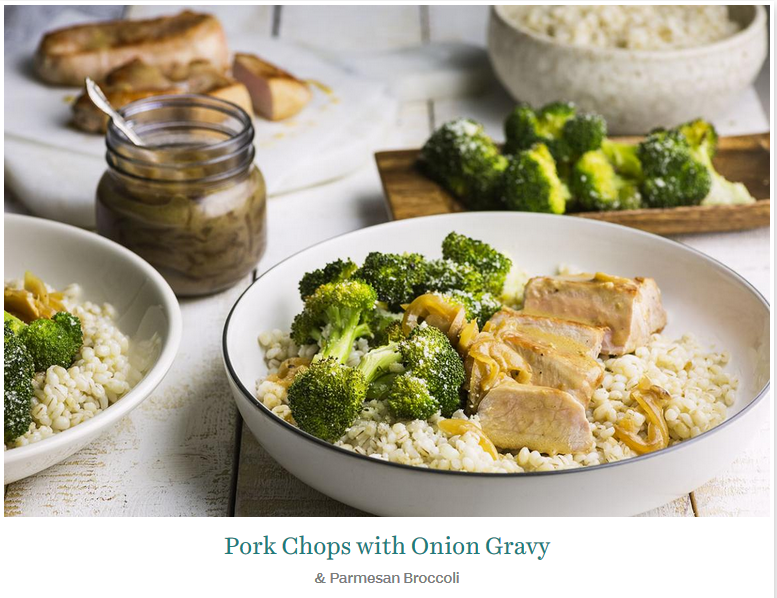
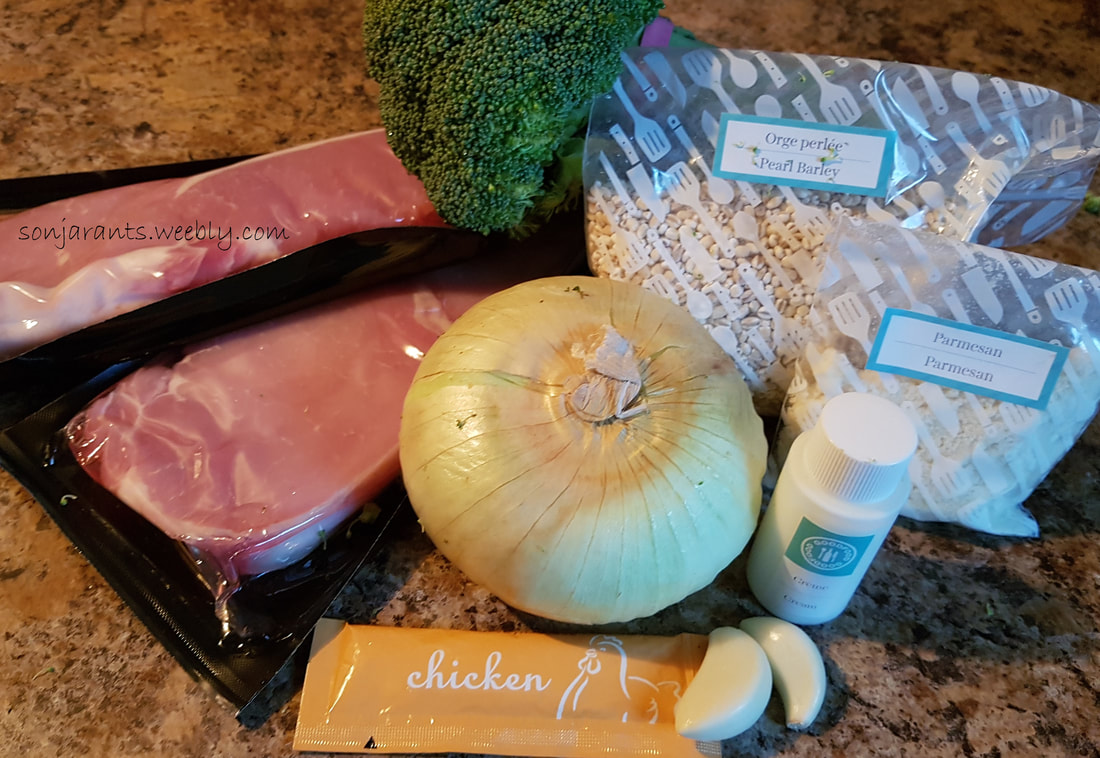
Day Three was Pork Chops with Onion Gravy and Parmesan Broccoli. I was the least excited about this meal because we eat pork chops all the time. However, this meal was even more enjoyable than the shrimp meal. The parmesan on the broccoli was a nice, sharp contrast to the sweetness of the gravy on the chops and barley. Definitely keeping this recipe! The recipe card states 40 minutes for prep time, but once again I took almost an hour. There were a lot of components to this recipe, and a lot you had to pay attention to. It was worth it, though. 
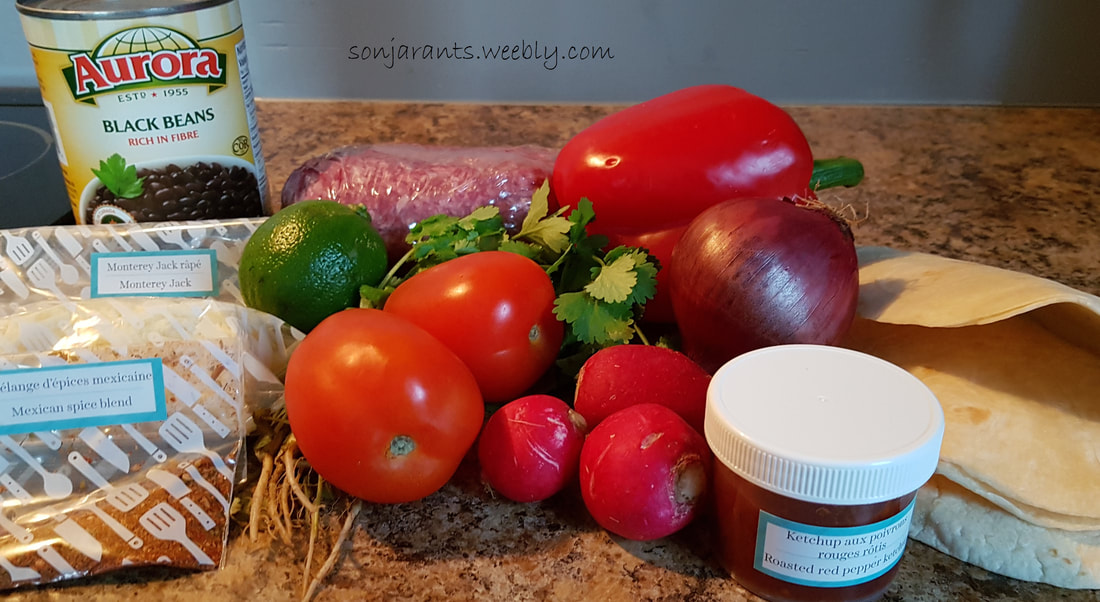
And we come to Day Four: Loaded Ground Beef Nachos with Fresh Salsa. My kids were looking forward to this one all week. Unfortunately, with all the stuff on it, my picky youngster would only try one chip. That was okay with the rest of us, because we really enjoyed dinner. Even with all of the fine chopping, this meal was on the table in an hour (The card said 40 minutes). It seemed like every meal this week featured an ingredient I am not fond of, so I give a whole lot of credit to GoodFood for designing meals that made me enjoy these foods! Today's ingredient was the radishes. Truthfully, I almost didn't use them. I am really glad I stuck to the recipe because they were a delicious addition to the nachos, along with the red pepper ketchup. There was a lot going on with this nachos, and yet every flavor shone through and it was a harmony for my taste buds. I work nights. I'm embarrassed to admit it, but lately I just can't find the energy to plan my meals, do my grocery shopping, then actually get into the kitchen and get it all together. Yes, it's the nights, but it's also the fibro, and the long, cold winter. By mid January I was already done with it. GoodFood has been an absolute lifesaver this week. Our family ate delicious, fresh, home cooked meals and I didn't have to put too much effort into it. I was able to wake up on my worst day, pull my ingredient bag out of the fridge, and be sitting down to a simple, yet wonderful, meal in less than an hour. I am extremely happy that I signed up for this service. The ingredients are fresh, perfectly portioned and pre-washed. The recipes are relatively simple but full of flavor. The price is very fair, and the portion sizes are perfect - no one is going hungry in this house. We put our meals in order of preference and here it is: ME: 1- Shrimp 2- Nachos 3- Pork Chops 4- Chana Masala HUBBY: 1- Shrimp 2- Pork Chops 3- Nachos 4- Chana Masala 18 YO: 1- Pork Chops 2- Nachos 3- Shrimp 4- Chana Masala 13 YO: 1- Shrimp 2-Pork Chops 3- Nachos 4- Chana Masala
All opinions expressed in this blog are my own, unbiased after testing the product. The product was fully paid for by myself. The subject of this blog entry has no expectation of a review, favorable or otherwise.
I'm sure you've pinned and clicked through many of these on Pinterest. I'm a big fan of them myself - the only problem with the vast majority? They're not realistic. I have yet to find one which would actually feed my family - 6' 2" hubby, 6' eighteen year old son, thirteen year old son, and myself.  The taglines are so enticing... "How I Feed my Family of 7 on a $85 Weekly Budget", "How to Feed a Family of 5 on $200 a month", "How I Feed my Family of 6 for $200 a Month", and my personal favorite, "Real Food Meal Plan: Four Weeks Four Mouths $330". I could spend this entire post breaking down the feasibility of each of these four examples, but I'm here for a better purpose today. Let me just point out that what these posts, along with the hundreds like them have much in common; they're only counting dinner, the meals are pretty much chicken, rice, and some canned stuff thrown in for good measure, and often they are talking about feeding small children who eat like mice. If these families are making this work, good on them, but not even one of them would work for my family. First off, we need to eat actual food. Secondly, we're not that fond of chicken. We like it, don't get me wrong, but if I served chicken on Monday, chicken soup on Tuesday, chicken rice on Wednesday, chicken tacos on Thursday (you get the idea), my family would revolt. Yes, you cannot be too choosy when you're eating on a budget, but food is not just fuel, it should be flavorful, nutritious, and delicious. That is what we are used to. Which is probably why our grocery budget was absolutely out of control. I was spending my (pathetically sad) $300 weekly paycheck on food, and when you do that , there is not much left over for things like bills, or heaven forbid - fun. Which is why I decided to take a good look at some of these and come up with a plan that can actually be used on a large scale. Another thing I'd like to mention is that I have yet to come across a Canadian budget meal planner. I'm sure they're out there, but I've only clicked through American ones. Why does that matter? Because I cannot go to the grocery store and pay .89 for a dozen eggs, nor can I get a whole chicken for $3. My cost could be double some of these in some cases. So I had to tailor it to my food prices. Now, if you're living in the States and you're reading this, you could possibly shave about a third off of my cost, just because your prices are lower in many areas, which is just an added bonus for you. Before I get into the meal plan - three meals a day, every day, for one week - I'd like to share some pointers that will make this so much easier for you. What I'm about to tell you is no secret - many of the links and posts widely available offer much of the same advice. Actually, a large number of these "Feed your family on a budget" posts do not actually contain meal plans, they just give you pointers like 'clip coupons', 'buy in bulk', 'batch cook', and 'love your crockpot'. All fine suggestions, but we don't have a whole lot of coupons here in Canada (not like in the States), and I have yet to find a coupon for anything in the produce section. Buying in bulk means you need a place to store all of your bulk (and it means cans and boxes, which I am not fond of), no one wants soup or stew every night, and don't get me started on batch cooking. Tried it once - no thank you. So here are my pointers: Plan Out Your Week. Whether it starts on a Sunday or a Tuesday doesn't matter. Get a pen and a piece of paper and find a comfy chair. I write out the days of the week, and the first thing I do is make a note of which days I'm working. Nights, actually, I work 11pm-6:30am, which should make this whole cooking three squares a day even more difficult for me, so if I can do it, so can you. The reason you're doing this is so that you do not plan a complicated dish on a day you're going to be excessively tired or busy running around. Use leftovers or simple dishes on those days to make your life easier. Write Out Your Meals Write down seven breakfast dishes, seven lunches, and seven dinners. You'll trim this down as you decide because some dishes are 2-day deals, i.e. oatmeal, chili, or soup. But writing down three for each day gives you a variety of choices. Whatever you decide to take out can always be pushed to the next week. Now trim your list. My list includes two different kinds of oatmeal, donuts, and muffins, and that covers my week. My lunches are tuna melt pie, scones, and sandwiches. My dinners consist of chili, soup, pizza, sliders, and pasta. More on all of these later, but you can see a wide variety of food - actual food. I highly recommend Pinterest for this exercise because you can just search "cheap dinner", "budget friendly meals", etc., and you'll get a ton of ideas. Draw on your own experience also. There's nothing wrong with meatloaf, spaghetti, or whatever your family has always loved. So trim your list by making notes of which meals will have enough leftovers for a second day, you'll see what I mean in my plan. Write Out ALL The Required Ingredients. You mean even things like salt or pepper? Why? A couple of reasons. First, you're going to make one trip to the grocery store. You heard me. One. Can't do that if you missed something. Second, you may think you have an ingredient, but when you go to the cupboard to get it while you're cooking you find that you are out of it. That sucks and has happened to me more times than I like to admit. Third, you may think you need an ingredient, but guess what? You have four of them in the back of the fridge because you keep buying it. Going once and getting everything you need and only what you need saves you time and money. If you're like me this will be very strange. I am used to shopping 2-4 times per week. I am also used to throwing stuff out because I forget I bought it because I had no actual plan for it, and now it went bad. More money wasted. And I work at a grocery store - so if I can limit my food purchases to once a week, you definitely can. Trim Your List Once you've written everything out, go through your cupboards, fridge, freezer, pantry, and everywhere else you house foodstuffs and cross off anything on your list that you have on hand. Most likely you have things like salt (I was almost out of pepper, so that will stay on the list next week), baking powder, or flour. But you may be surprised at what you do have sometimes, tucked away in the shadows. Now you have your basic list. I whittled a list of over 60 items to less than 30 - sweet. This is what you will venture out to buy. If you are a coupon clipper, now is the time to go through your coupons and see what you have that will help you with your list. I am not into coupons, not because I don't want to be, there just isn't much that I purchase in the coupon world. I do suggest 2 apps here that will help you immensely. If you are not using the flipp app to shop, you're nuts. I absolutely love it. At this point I pop in my basic list and look for sales on the items I need. I usually only shop at two stores, FreshCo and Real Canadian Superstore, the first because the prices are great (but the selection is meh), and the second because although the prices are a bit high, I can often find anything FreshCo doesn't carry here (plus I work there so I get my [truly mind boggling, how do they stay in business] 10% discount). Both stores price match, and I can do that right from the app. The second app I suggest is Checkout51, which saves you a little bit here and there. You just look to see if anything you bought is offered, take a pic of your receipt, and you're good. You won't get rich off of it, but it's easy and it helps a little. This week I got $1.00 cashback for buying the Eggo waffles, which I was buying anyway. *NOTE* I don't know how widely these apps are distributed, I live in Ontario, but I'm sure you will have something similar in your area. Go Shopping And buy ONLY what is on your list. Yes, those strawberries look so delicious. Sure, that cake is on sale. Oh yeah, the chips are 2 bags for $5. Do not give in. You are on a budget. Whatever reason got you here, you must think of it and buy only what you see on your list. And only make this one trip. It may be to two or three stores, but do it in one go. It's a time saver in the end, but it also cuts down on the temptation to impulse buy. The only time I encourage you to go off list is if it is an extremely good price and it is something that can keep for a bit. Maybe you only need one can of romano beans, but they're on sale for .88, and that's a good deal. I would buy maybe four or five cans (all different), and possibly use them the next week. Okay, enough about all that. I'm sure I'm not really telling most of you anything you don't already know. Here is the part that made you visit here in the first place:  7 Day Meal Plan for a Family of 4 for about $100 Day One Breakfast: Banana Chocolate Chip Muffin (2-day recipe - approximate cost per day <$2, my cost was $0) Lunch: Tuna Melt Pie + Salad (2-day recipe - approximate cost per day ~$7, my cost was $5.50) Dinner: Beans & Pasta (approximate cost <$5, my cost was $3) Day One Notes: I made the muffins and pie the day before and the salad was simple, I bought a big bag of organic mixed spring greens for $5 which will make about 6-8 servings, a great addition to a smallish lunch and easy enough to take to work. The beans & pasta is a staple dish in our home and very simple: 1/2 pkg elbow macaroni 2 cans romano beans (do not drain them) 2 strips bacon 1 tsp oregano 2 tsp garlic powder 1 tsp paprika 1 onion, chopped salt & pepper to taste 1] Boil pasta 2] While pasta boils, chop bacon & fry until crispy, do not drain. Add onions and saute until translucent, about 5 minutes. Add spices and stir. 3] Add beans and liquid to bacon/onion mixture and bring to a boil, stirring frequently. Once boiling, reduce heat to low and stir once or twice. Let cook another 5 minutes. 4] Drain pasta and add to bean mixture. Remove from heat. Stir until all pasta is covered and serve. See? Simple.  Day one cost about $14 if you purchased all the necessary ingredients. My cost was about $8.50. Day Two Breakfast: Banana Chocolate Chip Muffin Lunch: Tuna Melt Pie + Salad Dinner: Southwestern Style Chili (3-day recipe - approximate cost per day $5.50, my cost was <$4) Day Two Notes: A pretty easy day with two meals consisting of leftovers so no need to cook. The chili can be made stovetop (as I did) or in the crockpot, as the recipe calls for. I froze the third day's serving as it is actually a little less than what would feed all of us and I think it would be great for chili cheese dogs next week. The chili pricing includes the toppings: cilantro, sour cream, and shredded cheddar cheese.  Day two cost about $14.50 & my cost was about $9.50. Day Three Breakfast: Slow Cooker Pumpkin Pie Oatmeal (2-day recipe - approximate cost per day $2. My cost was $1.50) Lunch: Bacon, Cheddar, and Chive Scones + Salad (2-day recipe - approximate cost per day $6. My cost was $4.50) Dinner: Southwestern Chili Day three notes: The oatmeal cooked overnight and was hot and ready to go in the morning. I baked the scones the day before and froze half of them for next week.  Day three cost about $13.50 and my cost was <$10. Day Four Breakfast: Pumpkin Pie Oatmeal Lunch: Cheesy Frittata + Salad (2-day recipe - approximate cost per day $6. My cost was $2.) Dinner: English Muffin Pizzas (Approximate cost $9.) Day four notes: The pizzas are another fun staple in our house, and so simple to make! 2 packs (of 6) of english muffins 2 small cans pizza sauce (you can get away with one but we like a lot of sauce) 1 can mushroom pieces and stems 1 snack pack of mini pepperoni 1 onion, sliced 1 sweet pepper, sliced 2 cups shredded mozzarella Halve the muffins, spread pizza sauce, top with cheese, then all other toppings. Bake at 350deg for about 10-15 minutes, or until the cheese is bubbly and slightly browned. Feel free to add or remove any of the toppings, put whatever you like on them, they're quick, easy, and delicious.  Day four cost about $17, with my cost about $13. Day Five Breakfast: Donuts (Approximate cost is $3.50) Lunch: Frittata + Salad Dinner: Golden Coconut Lentil Soup (2-day recipe - approximate cost per day $2.50. My cost was $0) Day five notes: Yeah, I know you got all excited about the donuts, then clicked on the link and got weirded out when you saw what the donuts were made of. Trust me, it's okay. It's just a little cheat and we are not a bunch of snitches, so our secret is safe.  Day five cost about $14.50 and my cost was $8. Day Six Breakfast: Slow Cooker Apple Cinnamon Oatmeal (2-day recipe - approximate cost per day is $2. My cost was $0) Lunch: Reuben Stromboli + salad (approximate cost $12.50. My cost just over $11.) Dinner: Coconut Lentil Soup Day six notes: Remember when I told you to write out EVERY ingredient and then go from there? I did not write the dressing down for the reuben recipe because I really just glanced at it and came to the conclusion that it was only for the dip, and I was not going to make the dip, so I did not need the dressing. So I did not put it on my list at all. Boy was I wrong, and I don't even know how I missed the necessity of the spread on the bread. Anyway, I always have mayo in my fridge, so that was a quick save.  Day six cost about $17 and my cost was about $11.) Day Seven Breakfast: Apple Cinnamon Oatmeal Lunch: Chicken Nugget Eggo Waffle Sliders (Approximate cost $12) Dinner: Sausage & Egg Sliders (Approximate cost $14. My cost about $13.) Day seven notes: Today turned out to be slider day, I don't think I planned it, but I didn't hear anyone complaining. I have to give you the link to Chicken Waffle Sliders because that's where I got the idea for my chicken nugget sliders, and I like to give credit when credit is due. I took their idea but made it easier by just buying a package of Jane's chicken nuggets and topping each one with a little mayo, lettuce, and 1/3 of a grape tomato. Yum!  Day seven was the most expensive day by far at $28, with my total around $25.) The approximate total cost for 3 meals a day which actually, realistically, feed a family of four for 7 days turned out to be about $119. My total was a little lower at $84.50. Your total would also differ depending on what you already have in your home. However, even if your fridge is empty and your cupboards bare, I have shown you how to keep your family well fed on about $120. One last thing I would like to comment on before I send you off: drinks. We drink a lot of water in our house. (Real) juice is a weekly treat, and pop is a rarity, really only when we have company and we all indulge, a few times a year. We also drink coffee (the adults) and tea, both hot and iced. If you're trying to wean yourself or your family off of pop and juice, try squeezing the juice of a lemon or orange into a pitcher of water. Maybe some fresh mint (slightly muddled), or even a few chopped strawberries. Ease your family into it. I won't judge, it's your family, you can ingest what you like, but I feel like if you just give good old H2O a chance, you may find you enjoy how refreshing it can be. And it's also a heck of a lot cheaper ;) I thank you for sticking around, I know, this was a really long post, but I wanted to be as thorough as possible because the very simplicity of the other posts made me feel it was a waste of time to click through. Comments are always welcome - let me know if you've tried my plan, or if you have any inexpensive but delicious recipes I can add to a future plan. Bon Appetit!
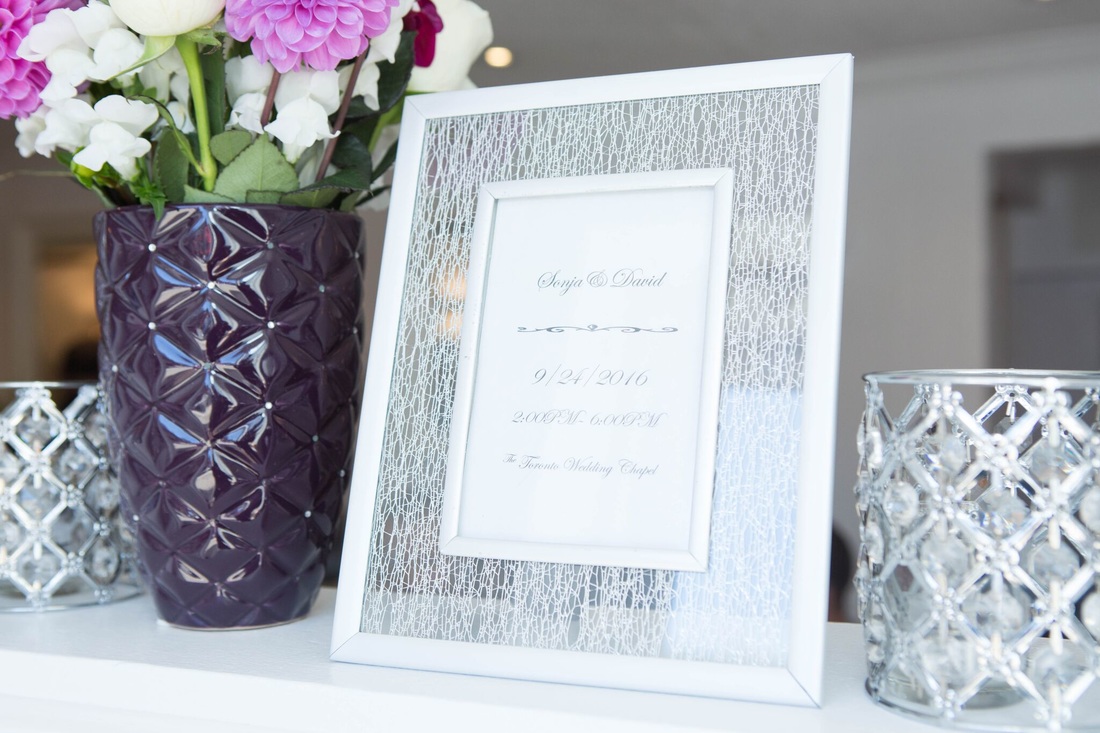
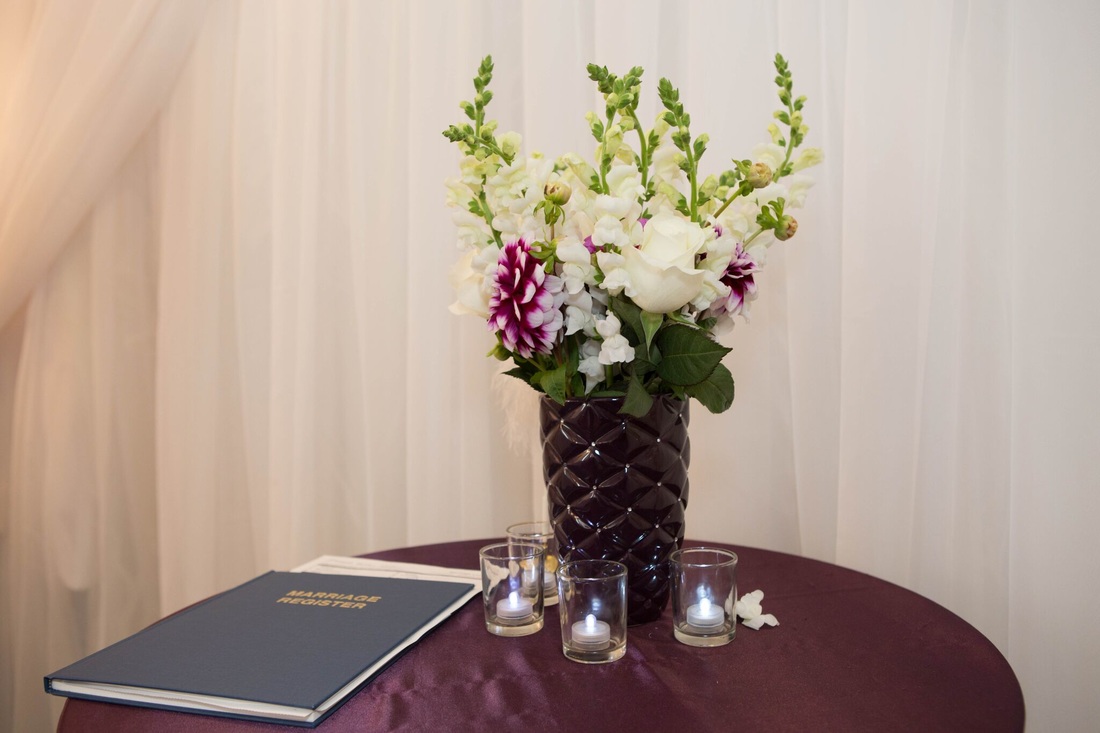
 After 20 years together (16 of them living together as common-law), David and I decided to celebrate our anniversary on Saturday, September 24th by getting married. When we first decided to finally (legally) tie the knot, we thought we would just have a civil ceremony at City Hall, and find a country club or something to that effect that could host our small reception afterward. While researching this option I stumbled across the Toronto Wedding Chapel.
After I checked out the website, David and I discussed our budget and looked at the various packages available.   First off, I was incredibly grateful that the pricing structure was listed on the website. I looked at so many country clubs and other smaller wedding venues, and only about 15% had their fees listed. I understand that this price that I'm looking at here will not be the actual cost. We booked the "Two Hearts" package, and after we added all the extras, we paid well over the starting price of $3000. But when you're first trying to figure out what you want for your ceremony and reception, and you're looking for a ballpark of what this thing will cost you, seeing actual numbers on the screen are a godsend. After choosing the 'Two Hearts' package, I sent off an email to make sure that our date and preferred time slot was available. Obviously it was. After that, we booked an appointment and went to discuss the package and our options.  I know, it doesn't look like much from the outside. David and I were questioning our decision about this place when we first walked up to it. However, the inside definitely makes up for how simple the exterior is. With everything in life, you have to weigh the pros and cons and decide if the choice is worth it. 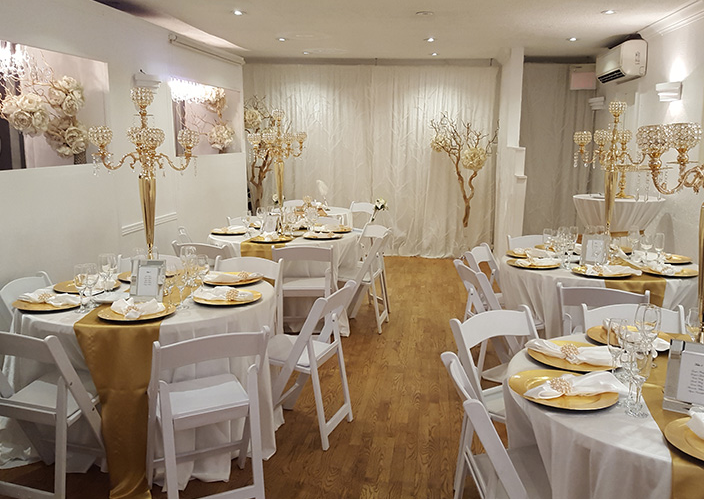 One of the pictures from the TWC website. After speaking with Lara, we decided to go ahead and book our wedding. The inside was pretty, elegant, and looked perfect to host our small wedding. Since we had to go all or nothing so we wouldn't offend anyone, we decided ours would only include our immediate family members - all told, we had 18 guests. 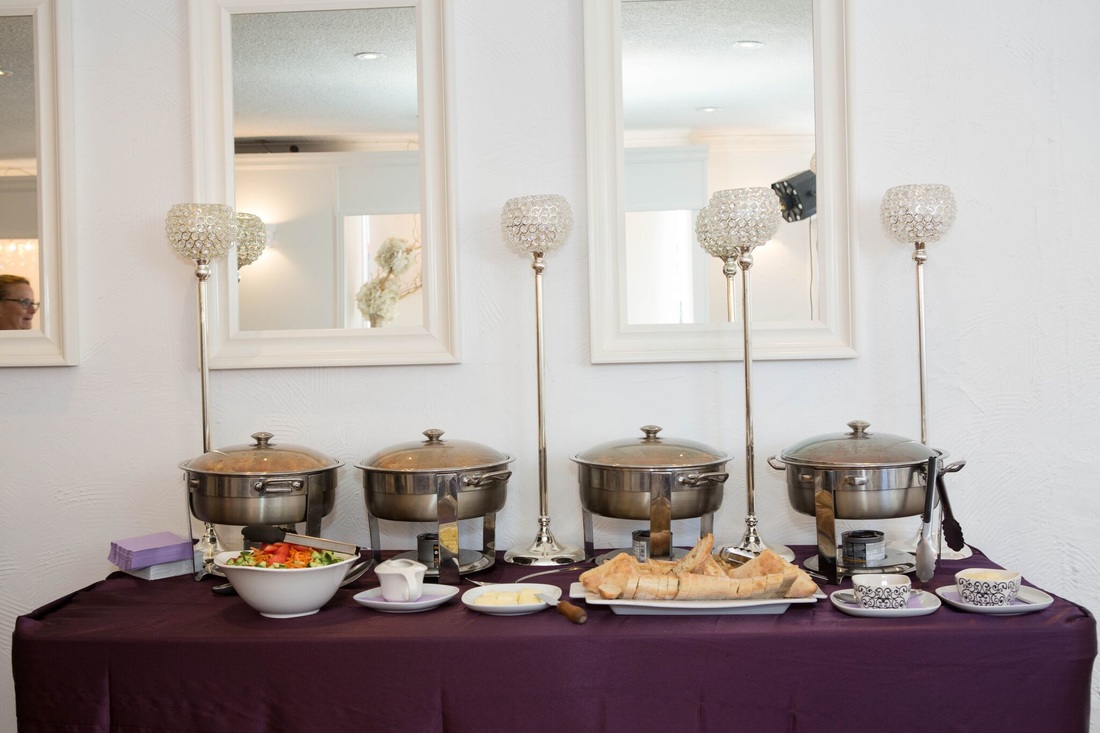 At the initial meeting we discussed colours, what kind of food, flowers, etc. My mind was definitely at ease once I left, as they would take care of almost everything. Pretty much all David and I had to do was get our license, clothing, and the music. When I say they take care of everything, I mean everything!
Once we signed our contract and paid our deposit, we really didn't hear much until about two weeks before the date of the ceremony. To be honest, by this point I was starting to panic a little. Would everything be okay? How would it look? What are we supposed to do? With larger weddings at churches and the like there is a rehearsal so that everyone knows what's going on. That is not the case here. That's okay with us, as we live in Oshawa and I really didn't want to drive an hour into Toronto for a fifteen minute walkthrough just to turn around and drive back. Plus, that was a really busy couple of weeks at work and I really wouldn't have been able to find the time to go.  I didn't need to worry. Katherine called about a week and a half before and confirmed the colours, the guest list, the food, cake, decorations, pretty much everything I was stressing about. And when we walked in and got our first look at the space, it was magic. Everything was perfection. She had chosen the perfect colours and everything looked wonderful. Katherine had even planned for a maid of honor - I didn't have one, and she forgot to ask, so she planned for one just in case. This is the attention to detail that you receive at the TWC.
The officiant came up to see me before the ceremony, to find out a little about David and myself, so she could make the ceremony more personal. She did a wonderful job. After we signed the register, we went outside and took some pictures (we had a photographer for an hour included in the price!) while the crew set up the tables and food. When we got back inside, everything was set up for our dinner. The food (we chose Italian) was so good! So much better than I expected. We enjoyed penne, lasagne, veal cutlets, and a salad. Red and white wine was also served, along with champagne. Unfortunately, dessert was only cake, fruit, and some cookies my mother-in-law brought. I would have preferred to also have some pastries and coffee, but truthfully, since everything else was so good, that is definitely something I can let go!  While we were discussing the menu, I totally forgot about my mother-in-law's cheese allergy. I know, I'm terrible. If it makes you feel any better, I also forgot to mention my own allergy to pineapple (which was on the fruit plate, so I couldn't touch that). However, when Katherine found out that Mary couldn't eat anything but the salad, she first offered to run across to St. Louis Bar & Grill and get her some chicken wings (we all found that hilarious!), and when Mary said she was okay, and not to worry about her, Katherine went and got her some grilled meat! No one was going hungry at my wedding, thanks to Katherine! I only have two gripes. The first is the parking situation. This is totally out of TWC's hands, since they are right in downtown Toronto (off Yonge, just south of Eglinton). There was one parking spot for us, thank goodness, but our guests had to park on adjacent side streets. There is no space for them to create parking, so it's not really anything that can be changed, but I am putting it out there. We did inform our guests and emailed out maps with available parking areas about two weeks before so that everyone would be aware and prepared.  Finally, I just want to comment on the photographer. Firstly, as I mentioned, we had a photographer included in our package for one hour. That was incredible, because in less than a week after our event, we received almost 300 pictures! Unfortunately, a number of the pictures were either pixelated or blurry, which was disappointing. There were also a large number of pictures taken of the flowers, tables, decorations, etc., where I would have preferred fewer of those and more of the guests. That being said - I want to repeat that we received almost 300 pictures! That is amazing. And to get them within a week is pretty incredible. Although I was disappointed with some of them, on the whole, I am extremely pleased with the photographer and the photos we received.  So there you have it! I found a fantastic little gem of a wedding chapel in downtown Toronto. For an incredible price, you can have the small-scale wedding of your dreams - I know I did! Review also posted to Yelp - click here.
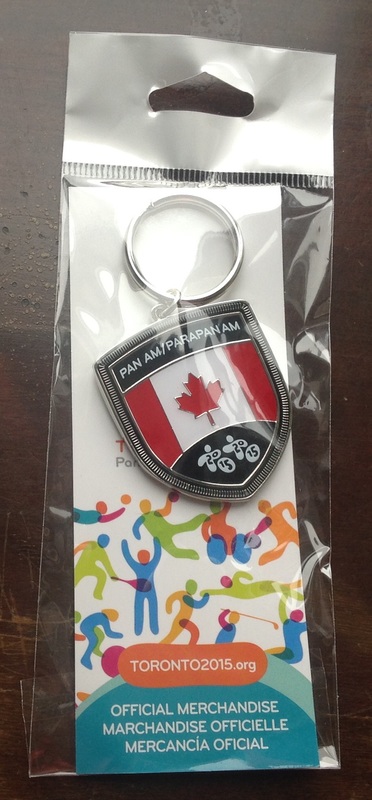
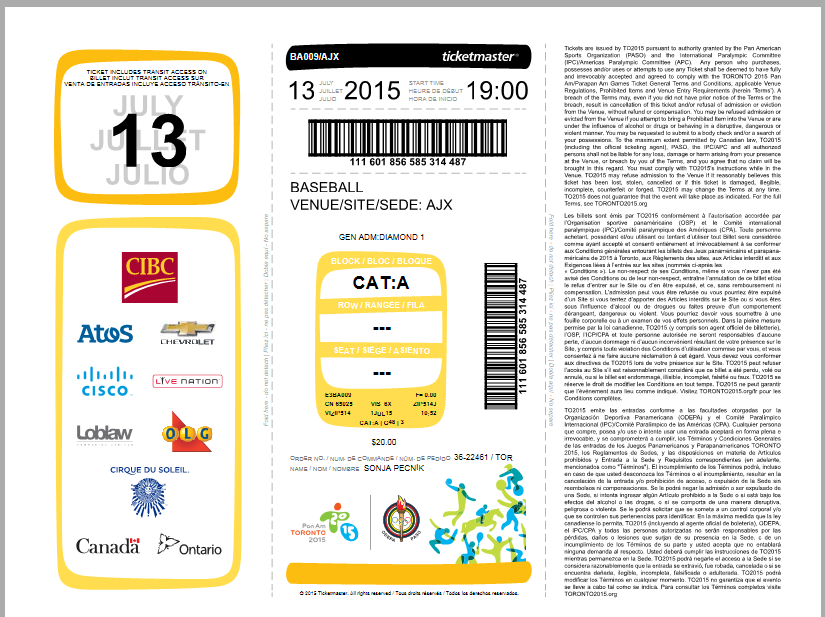
 Judging from news reports, I am one of the few people in Southern Ontario who was actually pretty excited that Toronto is hosting the Pan Am /ParaPan Am Games this time around. I know, It's not the Olympics, but I still think it's kinda cool that something this big is going on here. We had intended to see an event, just so we can say we were there and saw something happen. The nice thing about not all the events taking place in the city of Toronto is that those of us who just cannot stand the congestion can see an event in relative peace.  So on Canada Day I received an email that they were having a 25% off sale, and I jumped at the chance and bought 4 tickets to see Canada VS Nicaragua in a preliminary baseball game at the President's Choice Pan Am Ballpark. For 2 kids (under 16) and 2 adults, I paid $80 after discounts, taxes, and fees. Not bad. But I know why tickets are so affordable. Well, two reasons, I guess. The first being that they want people to come, so if they price the tickets reasonably, there's a better chance that families like mine will go. The second has to be the sick pricing structure for pretty much everything else at the venue. 
 I do also have one more thing to gripe about - the organization at the venue. Going into the game, I was not impressed. Happy during. Leaving the game I was not impressed. Living in Durham, we know the route to take to get to the location of the venue, Audley & Taunton. However, I suppose they did not expect too many people to be arriving from the Durham Region, because there was only one sign, approximately ten feet from the street we would have had to turn onto, telling us that Audley was closed at Rossland. As we drove past it, I saw it very quickly, but was not able to read the whole sign. Quite frankly, even if I had seen it sooner, we would not have had time to turn on Lakeridge anyhow. So we had to drive further West, then North, then back East, following the signs to get to the ballpark. I was none too impressed with that. There should have been ample warning so we could make a decision as to where to turn North sooner. 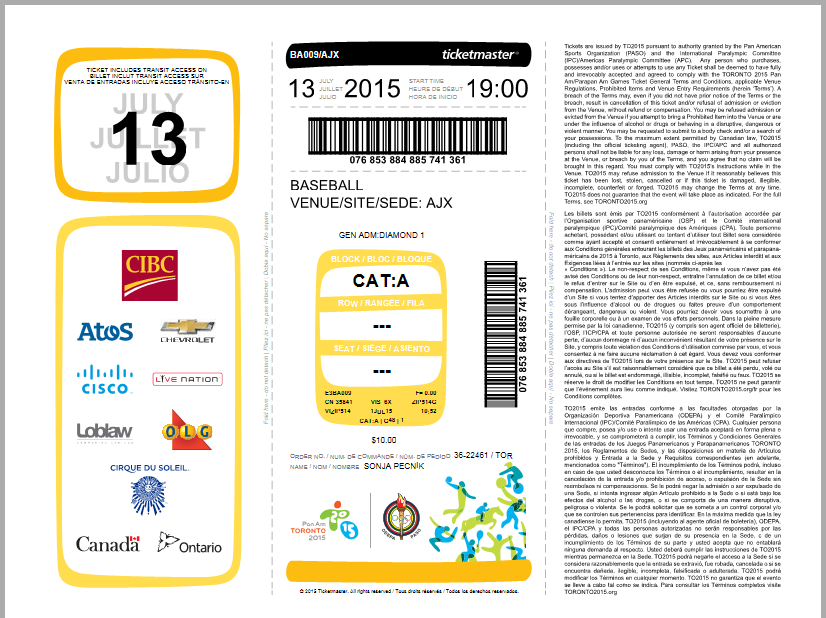 We get there, park in the grass, with very little direction at this point from signs or volunteers. You kinda just have to wing it and hope for the best. Did I mention the car was a 15 minute walk from the actual stadium? Well, it was. Ugh. Although it was lovely to walk in nature before we got to the event, I could have done without it, and I could have done without the weird walking path they had. There were these hard rubber sheets to walk on with deep grooves on them. Unless you're wearing thick-soled shoes (which I wasn't), they hurt your feet. Then came the gravel path, always fun to get stones in your shoes when you have a long way to walk. It's summer... people are wearing sandals and flip-flops. These two choices for something to walk on would probably be lower on my list, maybe just above 'hot coals' and 'broken glass sprinkled with salt'.  We get to the actual stadium (bottom of the second), and I was really, really underwhelmed as to the sight that greeted me. I was expecting some food, drink, and merchandise vendors. Instead, there was the ballpark to my right, I think a huge field of porta potties on the left, and a few random people selling bottled tap water or beer out of coolers. Since it was general seating, it was tough to find anything. There wasn't really anyone helping out, either. I wasn't really impressed at his point by my experience. Getting out was worse... no direction whatsoever, the only exit signs to be seen at the end of the lot, and if you're there, you already know where the exit is.  We finally did find some seats, and they turned out to be really great. We had a fantastic view of all the action, and since we were sitting in a predominantly Nicaraguan area, the players from Nicaragua were coming over and tossing balls into our area for the fans that stayed past the seventh inning. All the doom and gloom aside, I enjoyed the game. I am definitely more interested in winter sports, however, I have to say that it's always fun when your team is winning, and after a slow start, that's exactly what Team Canada did. The crowd was great, the seating sucked, but the experience was still enjoyable. As I mentioned before - organization was poor, which is pretty sad.  Don't let my doom and gloom stop you from going to see a game or two yourself. It's a once in a lifetime thing happening right now, and you should endeavor to take part in it in some small way. It is a great thing, and we should take pride in it.  One last thing. There has been a whole lot of talk about how little everyone cares about these games. I do want to point out that although I think it's great that they're here and I'll support them, they were really doomed from the start. Here in Ontario we are way more interested in winter sports than summer ones. We're also not the rowdiest of fans on a good day. Then, you have to remember that these are North & South American games. No European countries. You want tourists and pandemonium? Host a sporting even with European countries as participants. They'll come in droves. Just sayin'.    Yesterday I gave the lowdown on two drinks our family have incorporated into a healthier lifestyle, along with the recipe for lemon water and a promise that one for golden milk would soon follow. I won't give you the whole why this is awesome for my family spiel again (you can read yesterday's post here), instead here are the benefits of golden milk, and my own personal recipe.  Cinnamon This is another drink that is causing a lot of buzz on the internet. South Asia has known about the powers of turmeric forever and we in North America are just catching on. Turmeric is the spice (or root) that gives golden milk it's rich colour and one of the components that make it so great for your body. Google 'golden milk' and you'll get a plethora of hits, most giving you the standard recipe of: coconut milk, turmeric powder and honey. On it's own, this combination has some benefits, but with the addition of a few simple ingredients, you can pack so much more punch into your evening drink. About 90% (if not more) of the recipes call for turmeric powder. It is a fantastic spice and can be used that way if you prefer or if you do not have access to fresh. I will always choose the fresh option, picking up a whole bag of the root whenever I find it, however I do have ground turmeric in my spice cabinet and will use it when fresh runs out. Same goes for the ginger, although it is really easy to find in most stores. 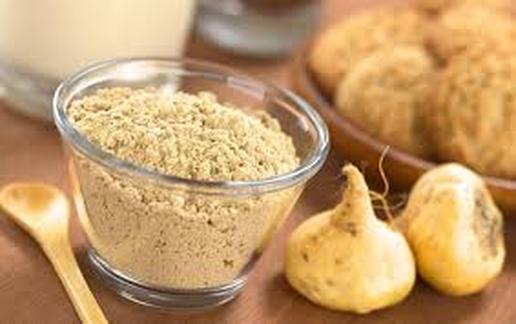 Maca A note about the ingredients: feel free to use cow, goat, coconut, almond, soy, or whatever type of milk you prefer. We started out with coconut milk, but we moved to cow's milk, as I find that we get a richer, creamier drink. The black pepper is added in because with it your body is able to absorb an astonishing 2000% more of the available curcumin in turmeric. Shocking, I know, what that little tiny addition will do. If you read yesterday's post you'll already know this, but I'm saying it again just in case: it is really important to mix the honey in after the milk has cooled slightly. High temperatures will kill the beneficial bacteria in it. Also, try to use raw, unpasteurized whenever you can. The difference in benefits is astounding when you remove the pasteurization (high heat...) process. To see yesterday's chart regarding this topic, click here.  Golden Milk 2 cups milk sliver fresh ginger 1/2" chunk fresh turmeric 2 whole black peppercorns pinch cayenne pepper 2 tsps honey 1/4 tsp maca powder 1/2 cinnamon stick (*note* I use a nutribullet for the first part. You can forgo the blending part and just chop smaller pieces and put everything together in your saucepan as is) Add 1 cup milk to blender. Add ginger, turmeric, peppercorns, cayenne and maca. Blend for 30 seconds. Place this along with remaining milk and cinnamon stick into a saucepan. Allow to cook on low heat, stirring occasionally, for about a half hour. Do not boil. After a half hour, remove from heat and allow to cool about 10 minutes. Strain into 2 cups and stir in 1 tsp honey each. Drink warm.  Cayenne Pepper Why drink this? Once you read all these benefits, you're going to wonder "Why am I not drinking this?" Yesterday we learned about the benefits of ginger and honey: Ginger improves the absorption of essential nutrients, helps relieve gas, bloating & nausea, and has anti-inflammatory properties. Honey helps prevent cancer & heart disease, reduces ulcers and gastrointestinal disorders, has anti-bacterial & anti-fungal properties, reduces coughs & throat irritation, regulates blood sugar, gives you great skin and is a probiotic. In addition to those benefits, in each cup of golden milk you'll get these boosts also: Turmeric boasts anti-inflammatory, anti-oxidant, antiseptic, & analgesic properties, boosts immunity, is an anti-carcinogenic, helps maintain cholesterol levels, promotes digestive health, detoxifies livers, regulates metabolism, lowers triglycerides, helps give you beautiful skin, and can help with high blood pressure, and improve memory & brain function. Maca is rich in vitamin B vitamins, C, & E. It provides calcium, zinc, iron, magnesium, phosphorous & amino acids. It can boost to your libido, balance your hormones & increase fertility. Can alleviate cramps, body pain, hot flashes, anxiety, mood swings, & depression. Energy levels may increase, along with an increase in mental energy & focus. It helps restore red blood cells, which aids anemia & cardiovascular diseases. May help clear up acne. Cayenne has the ability to ease upset stomach, ulcers, sore throats, spasmodic and irritating coughs, and diarrhea.It's an anti-cold and flu agent, has anti-fungal properties, can help prevent migraines, anti-allergen, digestive aid, helps reduce atherosclerosis, detox support, joint-pain relief, anti-bacterial properties, boosts metabolism, help balance LDL cholesterol & triglycerides, & helps prevent tooth & gum disease. Cinnamon helps with heart health, blood sugar regulation, better brain function, & improved motor function.  Black Pepper So I ask you again, why aren't you drinking this? Trust me, your body will thank you!
|
AuthorHi! I'm Sonja and I'm glad you're here! I'm happy to share some recipes and gardening tips with you while I let you know about great (or not so great) products, services, and media I encounter. Visit my online shop at MysteriousDragonfyre.com
for Crystals, Herbs, Incense, and other Witchy things! Categories
All
Hey look! You're visitor #
Visit my online shop at MysteriousDragonfyre.com
for Crystals, Herbs, Incense, and other Witchy things! |